This section introduces geospatial analysis of shapefiles with gdal, ogr, and osr. For interactive reading and executing code blocks  , or install Python and JupyterLab locally.
Watch this section and the Python tutorials in video formats
Watch this section as a video on the @Hydro-Morphodynamics channel on YouTube.
Laden Sie eine bestehende Formdatei
OSGeo’s ogr module handles shapefiles. After importing the library, obtain the "ESRI Shapefile" driver with ogr.GetDriverByName("ESRI Shapefile"). The driver can open a shapefile dataset with shp_driver.Open("path/to/file.shp"); obtain its layer with shp_dataset.GetLayer().
Run this notebook with marimo
Dieses Notizbuch ist auch als marimoNotebook (ein reaktives Python-Notizbuch, das als reine .py-Datei gespeichert ist) im marimo
Repository:
git clone https://github.com/sschwindt/marimo-python-course.gitDie Kursumgebung erstellen und aktivieren:
conda env create -f environment.ymlundconda activate hy-marimoStarten Sie im Ordner Repository das Notebook mit
marimo edit geo01-shp.py
from osgeo import ogr
shp_driver = ogr.GetDriverByName("ESRI Shapefile")
shp_dataset = shp_driver.Open("geodata/shapefiles/cities.shp")
shp_layer = shp_dataset.GetLayer()Erstellen Sie eine neue Formdatei
ogr also enables creating a new point, line, or polygon shapefile. The following code block defines a function for creating a shapefile, where the optional keyword argument overwrite is used to control whether an existing shapefile with the same name should be overwritten (default: True).
The command shp_driver.CreateDataSource(SHP-FILE-DIR) creates a new shapefile and the rest of the function adds a layer to the shapefile if the optional keyword arguments layer_name and layer_type are provided. Both optional keywords must be strings, where layer_name can be any name for the new layer. layer_type must be either "point", "line", or "polygon" to create a point, (poly)line, or polygon shapefile, respectively. The function uses the geometry_dict dictionary to assign the correct ogr.SHP-TYPE to the layer. There are more options for extending the create_shp(...) function listed on pcjericks’ Github pages.
from osgeo import ogr
import os


def create_shp(shp_file_dir, overwrite=True, *args, **kwargs):
    """
    :param shp_file_dir: STR of the (relative shapefile directory (ends on ".shp")
    :param overwrite: [optional] BOOL - if True, existing files are overwritten
    :kwarg layer_name: [optional] STR of the layer_name - if None: no layer will be created (max. 13 chars)
    :kwarg layer_type: [optional] STR ("point, "line", or "polygon") of the layer_name - if None: no layer will be created
    :output: returns an ogr shapefile layer
    """
    shp_driver = ogr.GetDriverByName("ESRI Shapefile")

    # check if output file exists if yes delete it
    if os.path.exists(shp_file_dir) and overwrite:
        shp_driver.DeleteDataSource(shp_file_dir)

    # create and return new shapefile object
    new_shp = shp_driver.CreateDataSource(shp_file_dir)

    # create layer if layer_name and layer_type are provided
    if kwargs.get("layer_name") and kwargs.get("layer_type"):
        # create dictionary of ogr.SHP-TYPES
        geometry_dict = {"point": ogr.wkbPoint,
                         "line": ogr.wkbMultiLineString,
                         "polygon": ogr.wkbMultiPolygon}
        # create layer
        try:
            new_shp.CreateLayer(str(kwargs.get("layer_name")),
                                geom_type=geometry_dict[str(kwargs.get("layer_type").lower())])
        except KeyError:
            print("Error: Invalid layer_type provided (must be 'point', 'line', or 'polygon').")
        except TypeError:
            print("Error: layer_name and layer_type must be string.")
        except AttributeError:
            print("Error: Cannot access layer - opened in other program?")
    return new_shp
The create_shp function is also provided with flusstools (flusstools.geotools.create_shp()) and aids to create a new shapefile (make sure to get the directory right):
a_new_shp_file = create_shp(
  r"" + os.getcwd() + "/geodata/shapefiles/new_polygons.shp",
  layer_name="basemap",
  layer_type="polygon",
)
a_new_shp_file = NoneShapefiles können auch in QGIS erstellt und gezeichnet werden, und die folgenden Figuren führen durch das Erstellen eines Polygon-Shapefiles. Wir werden die resultierende Shapefile in diesem Abschnitt nicht mehr benötigen, sondern später, um sie mit Rasterdatensätzen interagieren zu lassen.
The first step to making a shapefile with QGIS is obviously to run QGIS and create a new project. The following example uses water depth and flow velocity raster data as background information to delineate the so-called morphological unit of slackwater. Both the water depth and flow velocity rasters are part of the River Architect sample datasets (precisely located at RiverArchitect/SampleData/01_Conditions/2100_sample/). After downloading the sample data, they can be imported in QGIS by dragging the files from the Browser panel into the Layers panel. Then:
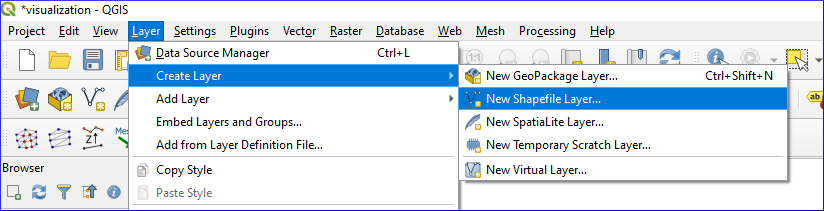
Figure 1:QGIS: Layer erstellen > New Shapefile Layer...
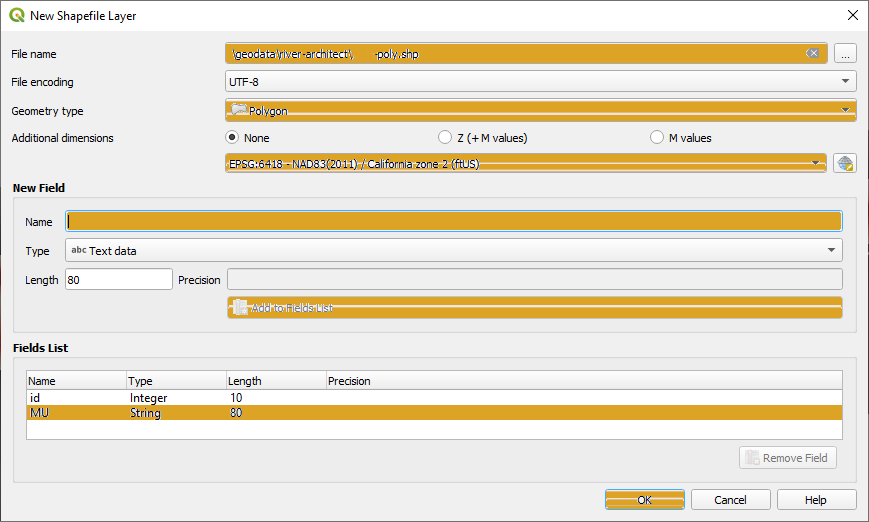
Figure 2:Definieren Sie neue Shapefile Layer

Figure 3:Shapefile Editing aktivieren
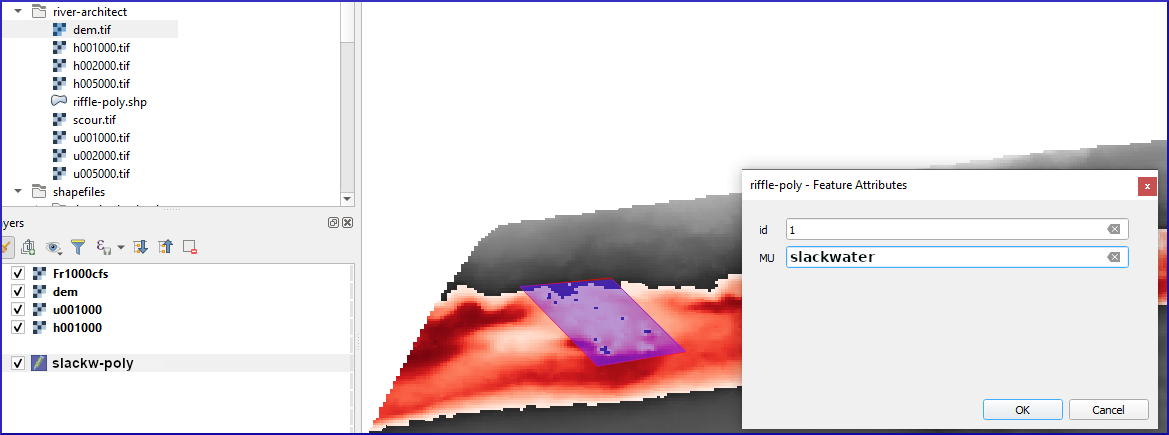
Figure 4:Zeichne Polygone in einer Shapefile in QGIS.
Erhalten Sie und setzen Sie formfile Projektionen
The terminology used in the .prj files of a shapefile corresponds to the definitions in the geospatial data section. In Python, information about the coordinate system is available through shp_layer.GetSpatialRef() of the ogr library:
shp_srs = shp_layer.GetSpatialRef()
print(shp_srs)
GEOGCS["WGS 84",
DATUM["WGS_1984",
SPHEROID["WGS 84",6378137,298.257223563,
AUTHORITY["EPSG","7030"]],
AUTHORITY["EPSG","6326"]],
PRIMEM["Greenwich",0,
AUTHORITY["EPSG","8901"]],
UNIT["degree",0.0174532925199433,
AUTHORITY["EPSG","9122"]],
AXIS["Latitude",NORTH],
AXIS["Longitude",EAST],
AUTHORITY["EPSG","4326"]]
Diese GEOGCS Definition der obigen Shapefile entspricht Esris bekanntem Text (WKT). Da das Shapefile-Format von Esri entwickelt wurde, muss Esris WKT (esriwkt) Format in .prj Dateien verwendet werden. Das Open Geospatial Consortium (OGC) verwendet in seinen EPSG:XXXX-Definitionen einen anderen bekannten Text (z. B. verfügbar unter spatialreference
GEOGCS["WGS 84",
       DATUM["WGS_1984", SPHEROID["WGS84", 6378137, 298.257223563, AUTHORITY["EPSG", "7030"]], AUTHORITY["EPSG","6326"]],
       PRIMEM["Greenwich", 0, AUTHORITY["EPSG", "8901"]],
       UNIT["degree",0.01745329251994328, AUTHORITY["EPSG","9122"]],AUTHORITY["EPSG","4326"]]
Um das Koordinatensystem einer Shape-Datei neu zu definieren oder neu zu definieren, können wir spatialreferenceurllib verwenden.
import urllib.request


# function to get spatialreferences with epsg code
def get_esriwkt(epsg):
    # usage get_epsg_code(4326)
    try:
        with urllib.request.urlopen("https://spatialreference.org/ref/epsg/{0}/esriwkt/".format(epsg)) as response:
            return response.read().decode("utf-8").strip()
    except Exception:
        pass
    try:
        with urllib.request.urlopen("https://spatialreference.org/ref/sr-org/epsg{0}-wgs84-web-mercator-auxiliary-sphere/esriwkt/".format(epsg)) as response:
            return response.read().decode("utf-8").strip()
        # sr-org codes are available at "https://spatialreference.org/ref/sr-org/{0}/esriwkt/".format(epsg)
        # for example EPSG:3857 = SR-ORG:6864 -> https://spatialreference.org/ref/sr-org/6864/esriwkt/ = EPSG:3857
    except Exception:
        print("ERROR: Could not find epsg code on spatialreference.org. Returning default WKT(epsg=4326).")
        return 'GEOGCS["GCS_WGS_1984",DATUM["D_WGS_1984",SPHEROID["WGS_1984",6378137,298.257223563]],PRIMEM["Greenwich",0],UNIT["Degree",0.017453292519943295],UNIT["Meter",1]]'
Diese Funktion kann zum Erstellen einer neuen Projektionsdatei verwendet werden:
# open the hypy-area shapefile
shp_file = "hypy-area"

# create new .prj file for the shapefile (.shp and .prj must have the same name)
with open("geodata/shapefiles/{0}.prj".format(shp_file), "w") as prj:
    epsg_code = get_esriwkt(4326)
    prj.write(epsg_code)
    print("Wrote projection file : " + epsg_code)
Wrote projection file : GEOGCS["GCS_WGS_1984",DATUM["D_WGS_1984",SPHEROID["WGS_1984",6378137,298.257223563]],PRIMEM["Greenwich",0],UNIT["Degree",0.017453292519943295]]
Eine Offline-Alternative zum Generieren einer .prj-Datei ist die osr-Bibliothek, die zusammen mit gdal kommt:
from osgeo import osr

def get_wkt(epsg, wkt_format="esriwkt"):
    default = 'GEOGCS["GCS_WGS_1984",DATUM["D_WGS_1984",SPHEROID["WGS_1984",6378137,298.257223563]],PRIMEM["Greenwich",0],UNIT["Degree",0.017453292519943295],UNIT["Meter",1]]'
    spatial_ref = osr.SpatialReference()
    try:
        spatial_ref.ImportFromEPSG(epsg)
    except TypeError:
        print("ERROR: epsg must be integer. Returning default WKT(epsg=4326).")
        return default
    except Exception:
        print("ERROR: epsg number does not exist. Returning default WKT(epsg=4326).")
        return default
    if wkt_format=="esriwkt":
        spatial_ref.MorphToESRI()
    # return a nicely formatted WKT string (alternatives: ExportToPCI(), ExportToUSGS(), or ExportToXML())
    return spatial_ref.ExportToPrettyWkt()
Transformieren (Re-Projekt) a formfile
A re-projection may be needed, for instance, to use a shapefile in EPSG:4326 (e.g., created with QGIS) in a web-GIS application (e.g., open street maps) that typically uses EPSG:3857. To apply a different projection to geometric objects of a shapefile, it is not enough to simply rewrite the .prj file. Therefore, the following example shows the re-projection of the countries.shp shapefile from the Natural Earth quick start kit. The following workflow performs the reprojection:
The shapefile to transform is located in the subdirectory
geodata/shapefiles/countries.shpand open it in the Python script as described above.Lesen und Identifizieren des in der Eingabe-Formdatei verwendeten räumlichen Bezugssystems:
Create a spatial reference object with
in_sr = osr.SpatialReference(str(shapefile.GetSpatialRef())).Erkennen Sie das räumliche Bezugssystem im EPSG-Format mit
AutoIdentifyEPSG().Weisen Sie das EPSG-formatierte räumliche Bezugssystem dem räumlichen Bezugsobjekt der Eingabe-Shapefile zu (
ImportFromEPSG(int(in_sr.GetAuthorityCode(None)))).
Create the output spatial reference with
out_sr = osr.SpatialReference()and apply the target EPSG code (out_sr.ImportFromEPSG(3857)).Erstellen Sie ein Koordinatentransformationsobjekt (
coord_trans = osr.CoordinateTransformation(in_sr, out_sr)), mit dem Geometrieobjekte später neu projiziert werden können.Create the output shapefile, which will correspond to a copy of the input shapefile (use the above-defined
create_shpfunction withlayer_name="basemap"andlayer_type="line").Kopieren Sie die Feldnamen und Typen der Eingabe-Shapefile:
Read the attribute layer from the input file’s layer definitions with
in_lyr_def = in_shp_lyr.GetLayerDefn()Iterieren Sie die Felddefinitionen und fügen Sie sie an die Ausgabe-Shapefile-Schicht an (
out_shp_lyr)
Iterieren Sie durch die Geometriemerkmale in der Eingabe-Shapefile:
Verwenden Sie die Layerdefinitionen der neuen Shapefile (
out_shp_lyr_def = out_shp_lyr.GetLayerDefn()), um später transformierte Geometrieobjekte anzuhängen.Definieren Sie eine Iterationsvariable
in_featureals Instanz vonin_shp_lyr.GetNextFeature.In a
whileloop, instantiate every geometry (geometry = in_feature.GetGeometryRef()) in the input shapefile, transform thegeometry(geometry.Transform(coord_trans)), convert it to anogr.Feature()with theSetGeometry(geometry)method, copy field definitions (nestedfor-loop), and append the new feature to the output shapefile layer (out_shp_lyr_def.CreateFeature(out_feature)).At the end of the
while-loop, look for the next feature in the input shapefile’s attributes within_feature = in_shp_lyr.GetNextFeature()
Unlock (release) all layers and shapefiles by overwriting the objects with
None(nothing is written to any file as long as these variables exist!).Assign the new projection EPSG:3857 using the above-defined
get_wktfunction.
from osgeo import ogr
from osgeo import osr

shp_driver = ogr.GetDriverByName("ESRI Shapefile")

# open input shapefile and layer
in_shp = shp_driver.Open(r"" + os.path.abspath("") + "/geodata/shapefiles/countries.shp")
in_shp_lyr = in_shp.GetLayer()

# get input SpatialReference
in_sr = osr.SpatialReference(str(in_shp_lyr.GetSpatialRef()))
# auto-detect epsg
in_sr.AutoIdentifyEPSG()
# assign input SpatialReference
in_sr.ImportFromEPSG(int(in_sr.GetAuthorityCode(None)))

# create SpatialReference for new shapefile
out_sr = osr.SpatialReference()
out_sr.ImportFromEPSG(3857)

# create a CoordinateTransformation object
coord_trans = osr.CoordinateTransformation(in_sr, out_sr)

# create output shapefile and get layer
out_shp = create_shp(r"" + os.path.abspath("") + "/geodata/shapefiles/countries-web.shp", layer_name="basemap", layer_type="line")
out_shp_lyr = out_shp.GetLayer()

# look up layer (features) definitions in input shapefile
in_lyr_def = in_shp_lyr.GetLayerDefn()
# copy field names of input layer attribute table to output layer
for i in range(0, in_lyr_def.GetFieldCount()):
    out_shp_lyr.CreateField(in_lyr_def.GetFieldDefn(i))

# instantiate feature definitions object for output layer (currently empty)
out_shp_lyr_def = out_shp_lyr.GetLayerDefn()

# iteratively append all input features in new projection
in_feature = in_shp_lyr.GetNextFeature()
while in_feature:
    # get the input geometry
    geometry = in_feature.GetGeometryRef()
    # re-project (transform) geometry to new system
    geometry.Transform(coord_trans)
    # create new output feature
    out_feature = ogr.Feature(out_shp_lyr_def)
    # assign in-geometry to output feature and copy field values
    out_feature.SetGeometry(geometry)
    for i in range(0, out_shp_lyr_def.GetFieldCount()):
        out_feature.SetField(out_shp_lyr_def.GetFieldDefn(i).GetNameRef(), in_feature.GetField(i))
    # add the feature to the shapefile
    out_shp_lyr.CreateFeature(out_feature)
    # prepare next iteration
    in_feature = in_shp_lyr.GetNextFeature()

# release shapefiles and layers
in_shp = None
in_shp_lyr = None
out_shp = None
out_shp_lyr = None

# create .prj file for  output shapefile for web application references
with open(r"" + os.path.abspath('') + "/geodata/shapefiles/countries-web.prj", "w+") as prj:
prj.write(get_wkt(3857))Im Erfolgsfall gibt die Codesequenz in_sr.AutoIdentifyEPSG() 0 zurück (d.h. sie erkennt erfolgreich die EPSG-Nummer), aber leider sind viele EPSG-Nummern AutoIdentifyEPSG() nicht bekannt. Falls AutoIdentifyEPSG() nicht richtig funktioniert hat, gibt die Methode nicht 0 zurück, sondern beispielsweise 7. Ein Workaround für die eingeschränkte Funktionalität von srs.AutoIdentifyEPSG() ist srs.FindMatches. srs.FindMatches gibt ein matching srs_match aus einer größeren Datenbank zurück, die etwas verschachtelt ist; zum Beispiel:
matches = srs.FindMatches()Dann sieht matches so aus: [(osgeo.osr.SpatialReference, INT)]. Daher sieht ein kompletter Workaround für srs.AutoIdentifyEPSG() (oder in_sr.AutoIdentifyEPSG() im Codeblock oben) so aus:
# set epsg and create spatial reference object
epsg = 3857
srs = osr.SpatialReference()
srs.ImportFromEPSG(epsg)

# identify spatial reference
auto_detect = srs.AutoIdentifyEPSG()
if auto_detect != 0:
    srs = srs.FindMatches()[0][0]  # Find matches returns list of tuple of SpatialReferences
    srs.AutoIdentifyEPSG()  # Re-perform auto-identification
Felder und Punktmerkmale zu einem formfile hinzufügen
A shapefile feature can be a point, a line, or a polygon, which has field attributes (e.g., "id"=1 to describe that this is polygon number 1 or associated to an id block 1). Field attributes can be more than just an IDentifier and include, for example, the polygon area or city labels as in the above-shown example illustrating cities.shp (shp_driver.Open("geodata/shapefiles/cities.shp")).
To create a point shapefile, we can use the above-introduced create_shp function (or flusstools.geotools.create_shp(shp_file_dir="")) and set the projection with the get_wkt() function (also above introduced). The following code block shows the usage of both functions to create a river.shp point shapefile that contains three points located at three rivers in central Europe. The code block also illustrates the creation of a field in the attribute table and the creation of three point features. Here is how the code works:
The shapefile is located in the
rivers_ptsvariable. Note that thelayer_typealready determines the type of geometries that can be used in the shapefile. For instance, adding a line or polygon feature to anogr.wkbPointlayer will result in anERROR 1message.Die
basemap(Schicht) wird der Variablenlyr = river_pts.GetLayer()zugeordnet.Ein string-Feld wird hinzugefügt und der Attributtabelle angefügt:
instantiate a new field with
field_gname = ogr.FieldDefn("FIELD-NAME", ogr.OFTString)(recall: the field name may not have more than 10 characters!)append the new field to the shapefile with
lyr.CreateField(field_gname)Andere Feldtypen als
OFTStringkönnen sein:OFTInteger,OFTReal,OFTDate,OFTTime,OFTDateTime,OFTBinary,OFTIntegerList,OFTRealListoderOFTStringList.
Add three points stored in
pt_names = {RIVER-NAME: (x-coordinate, y-coordinate)}in a loop over the dictionary keys:for every new point, create a feature as a child of the layer definitions with
feature = ogr.Feature(lyr.GetLayerDefn())set the value of the field name for every point with
feature.SetField(FIELD-NAME, FIELD-VALUE)create a string of the new point in WKT format with
wkt = "POINT(X-COORDINATE Y-COORDINATE)"convert the WKT-formatted point into a point-type geometry with
point = ogr.CreateGeometryFromWkt(wkt)set the new point as the new feature’s geometry with
feature.SetGeometry(point)append the new feature to the layer with
lyr.CreateFeature(feature)
Entsperren (Freigeben) der Shapefile durch Überschreiben der Variablen
lyrundriver_ptsmitNone.
shp_dir = r"" + os.path.abspath('') + "/geodata/shapefiles/rivers.shp"
river_pts = create_shp(shp_dir, layer_name="basemap", layer_type="point")

# create .prj file for the shapefile for web application references
with open(shp_dir.split(".shp")[0] + ".prj", "w+") as prj:
    prj.write(get_wkt(3857))

# get basemap layer
lyr = river_pts.GetLayer()

# add string field "rivername"
field_gname = ogr.FieldDefn("rivername", ogr.OFTString)
lyr.CreateField(field_gname)

# names and coordinates of central EU rivers in EPSG:3857 WG84 / Pseudo-Mercator
pt_names = {"Aare": (916136.03, 6038687.72),
            "Ain": (623554.12, 5829154.69),
            "Inn": (1494878.95, 6183793.83)}

# add the three rivers as points to the basemap layer
for n in pt_names.keys():
    # create Feature as child of the layer
    pt_feature = ogr.Feature(lyr.GetLayerDefn())
    # define value n (river) in the rivername field
    pt_feature.SetField("rivername", n)
    # use WKT format to add a point geometry to the Feature
    wkt = "POINT(%f %f)" % (float(pt_names[n][0]), float(pt_names[n][1]))
    point = ogr.CreateGeometryFromWkt(wkt)
    pt_feature.SetGeometry(point)
    # append the new feature to the basemap layer
    lyr.CreateFeature(pt_feature)

# release files
lyr = None
river_pts = None
The resulting rivers.shp shapefile can be imported in QGIS along with a DEM from the Natural Earth quick start kit.
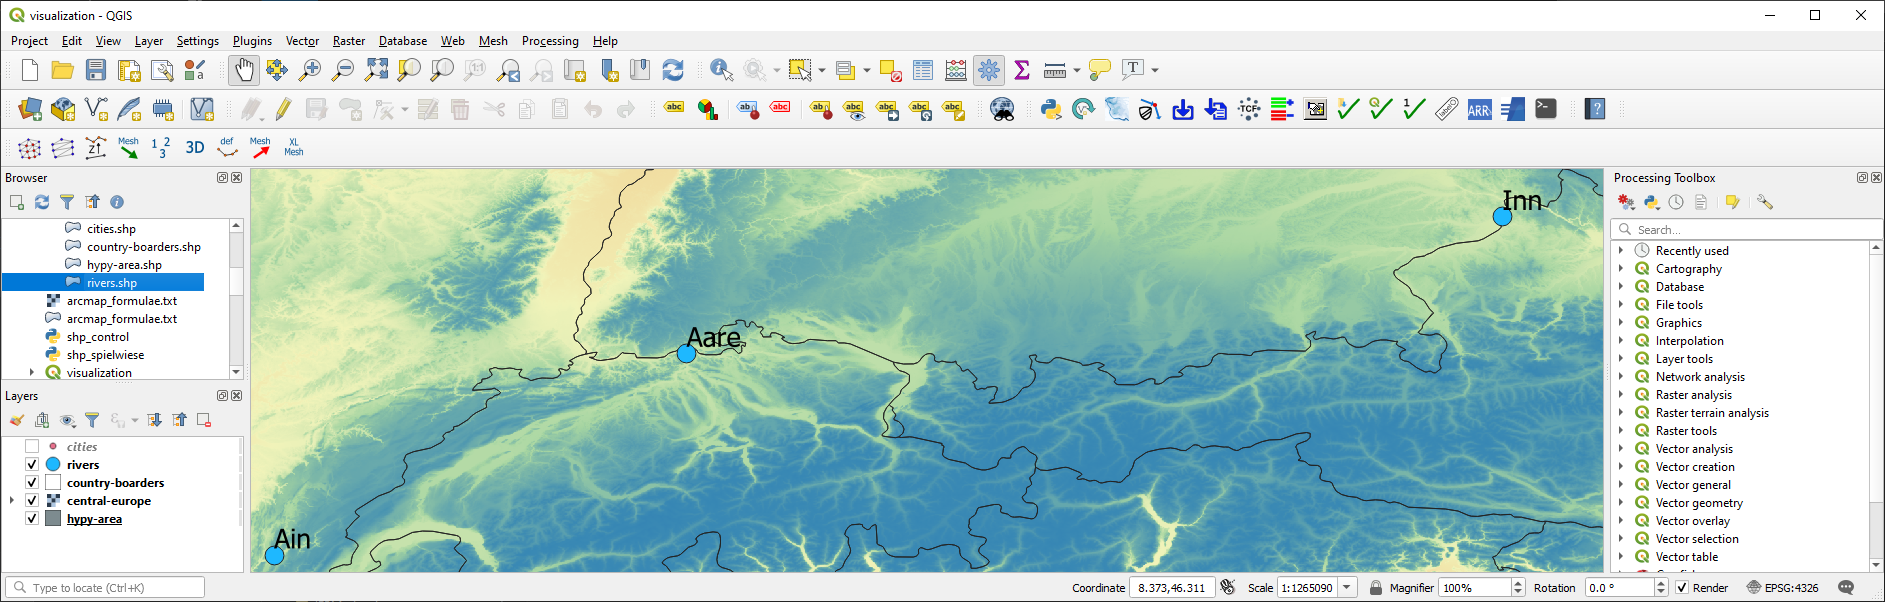
Figure 5:Die Flussnamen, die an Punkte in einer in QGIS gezeigten Punktformdatei gebunden sind.
Multiline (Polyline) formfile
Similar to the procedure for creating and adding points to a new point shapefile, a (multi) line (or polyline) can be added to a shapefile. The create_shp function creates a multi-line shapefile when the layer type is defined as "line" (flusstools.geotools.create_shp(shp_file_dir="", layer_type="line")). The coordinate system is created with the above-defined get_wkt() function.
Der folgende Codeblock verwendet die Koordinaten der Städte entlang des Rheins, gespeichert in einem Wörterbuch namens station_names. Die Stadtnamen werden nicht verwendet und nur die Koordinaten werden mit line.AddPoint(X, Y) angehängt. Wie zuvor wird ein Feld angelegt, um dem Fluss einen Namen zu geben. Die eigentliche Linienfunktion wird wieder als Kind der Schicht mit line_feature = ogr.Feature(lyr.GetLayerDefn()) erstellt. Durch den Betrieb dieses Codeblocks entsteht eine Linie, die ungefähr dem Rhein zwischen Frankreich und Deutschland folgt.
shp_dir = r"" + os.path.abspath("") + "/geodata/shapefiles/rhine_proxy.shp"
rhine_line = create_shp(shp_dir, layer_name="basemap", layer_type="line")

# create .prj file for the shapefile for web application references
with open(shp_dir.split(".shp")[0] + ".prj", "w+") as prj:
    prj.write(get_wkt(3857))

# get basemap layer
lyr = rhine_line.GetLayer()

# coordinates for EPSG:3857 WG84 / Pseudo-Mercator
station_names = {"Basel": (844361.68, 6035047.42),
                 "Kembs": (835724.27, 6056449.76),
                 "Breisach": (842565.32, 6111140.43),
                 "Rhinau": (857547.04, 6158569.58),
                 "Strasbourg": (868439.31, 6203189.68)}

# create line object and add points from station names
line = ogr.Geometry(ogr.wkbLineString)
for stn in station_names.values():
    line.AddPoint(stn[0], stn[1])

# create field named "river"
field_name = ogr.FieldDefn("river", ogr.OFTString)
lyr.CreateField(field_name)

# create feature, geometry, and field entry
line_feature = ogr.Feature(lyr.GetLayerDefn())
line_feature.SetGeometry(line)
line_feature.SetField("river", "Rhine")

# add feature to layer
lyr.CreateFeature(line_feature)

lyr = None
rhine_line = None
The resulting rhine_proxy.shp shapefile can be imported in QGIS along with a DEM and the cities point shapefile from the Natural Earth quick start kit.
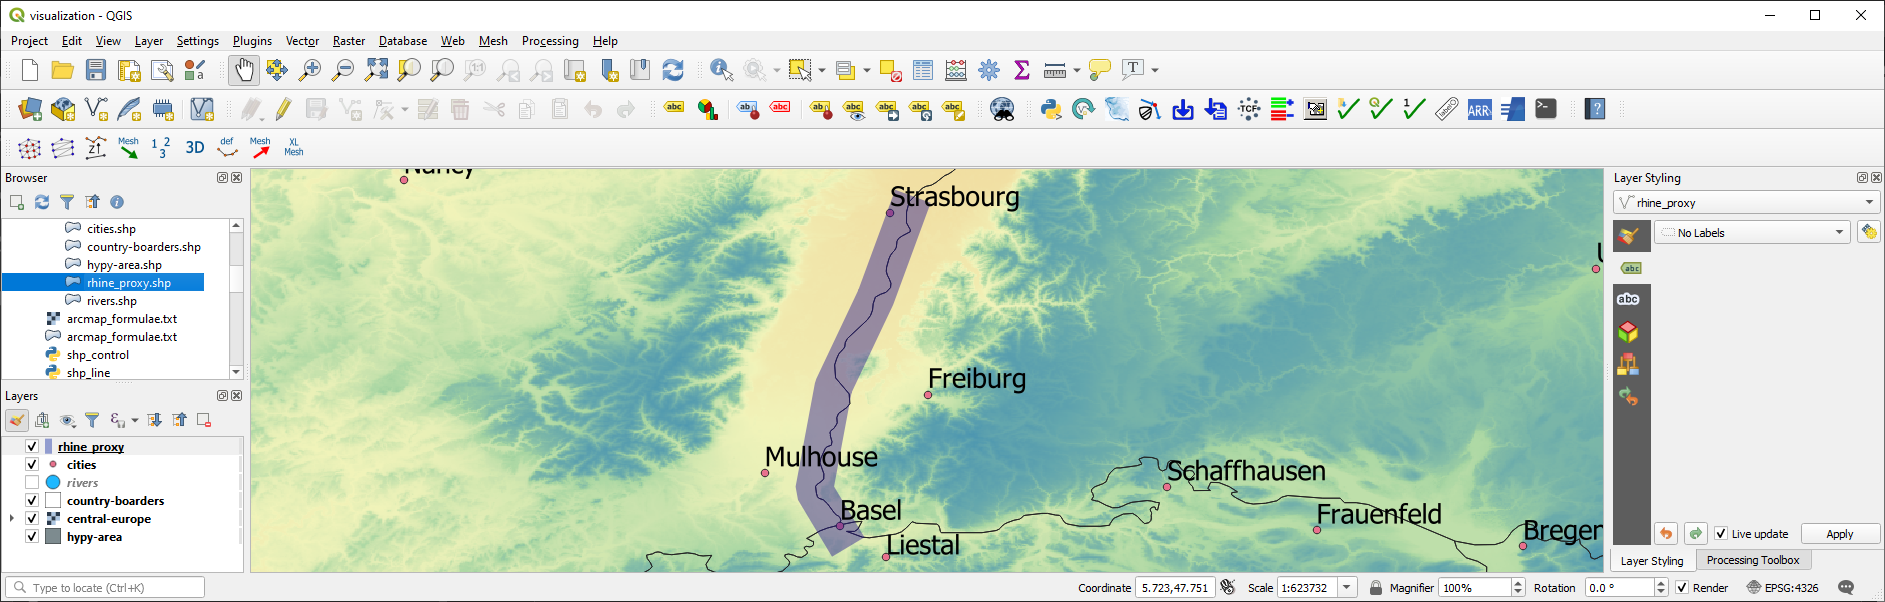
Figure 6:Die Linie, die den Rhein in QGIS annähert.
Polygon formfile
Polygons are surface patches that can be created point-by-point, line-by-line, or from a "Multipolygon" WKB definition. When creating polygons from points or lines, we want to create a surface and this is why the corresponding geometry type is called wkbLinearRing for building polygons from both points or lines (rather than wkbPoint or wkbLine, respectively). The following code block features an example for building a polygon shapefile delineating the hydraulic laboratory of the University of Stuttgart. The difference between the above example for creating a line shapefile are:
Die Projektion ist
EPSG:4326.The point coordinates are generated within an
ogr.wkbLinearRingobject step-by-step rather than in a loop over dictionary entries.Datei-, Variablen- und Feldnamen.
shp_dir = r"" + os.path.abspath("") + "/geodata/shapefiles/va4wasserbau.shp"
va_geo = create_shp(shp_dir, layer_name="basemap", layer_type="polygon")

# create .prj file for the shapefile for GIS map applications
with open(shp_dir.split(".shp")[0] + ".prj", "w+") as prj:
    prj.write(get_wkt(4326))

# get basemap layer
lyr = va_geo.GetLayer()

# create polygon points
pts = ogr.Geometry(ogr.wkbLinearRing)
pts.AddPoint(9.103686, 48.744251)
pts.AddPoint(9.104689, 48.744198)
pts.AddPoint(9.104667, 48.743960)
pts.AddPoint(9.103557, 48.744009)

# create polygon geometry
poly = ogr.Geometry(ogr.wkbPolygon)
# build polygon geometry from points
poly.AddGeometry(pts)

# add field to classify building type
field = ogr.FieldDefn("building", ogr.OFTString)
lyr.CreateField(field)

poly_feature_defn = lyr.GetLayerDefn()
poly_feature = ogr.Feature(poly_feature_defn)
poly_feature.SetGeometry(poly)
poly_feature.SetField("building", "Versuchsanstalt")

lyr.CreateFeature(poly_feature)

lyr = None
va_geo = None
Gestaltdatei von JSON erstellen
Das Laden von Geometriedaten aus inline definierten Variablen ist in der Praxis umständlich, da Geodaten häufig auf öffentlichen Plattformen bereitgestellt werden (z. B. Landnutzung oder Abdeckung). Im folgenden Beispiel wird eine JSON-Datei verwendet, die mit Kartendienstdaten des Baden-Württemberg State Institute for the Environment, Survey and Nature Conservation (LUBW) generiert wurde, wobei Polygonknoten im WKT-Polygongeometrieformat ("MultiPolygon (((node1_x node1_y, nodej_x, nodej_y, ... ...)))") gespeichert sind:
Die JSON-Datei (hq100-dreisam.json herunterladen und in einem Unterverzeichnis namens
/geodata/json/speichern) wird mit Pandas gelesen und die Shape-Datei wird wie zuvor mit dercreate_shp-Funktion erstellt.Die Projektion ist
EPSG:25832.Zwei Felder werden in Form von
"tbg_name"(der ursprüngliche Stringname der Polygone in den LUBW-Daten) und"area"(ein reelles Zahlenfeld, in dem der Polygonbereich in m2 unter Verwendung vonpolygon.GetArea()berechnet wird).
The polygon geometries are derived from the WKT-formatted definitions in the
"wkt_geom"field of the pandas dataframe objectdreisam_inundation.
import pandas as pd

# get data from json file
dreisam_inundation = pd.read_json(r"" + os.path.abspath("") + "/geodata/json/hq100-dreisam.json")

# create shapefile
shp_dir = r"" + os.path.abspath('') + "/geodata/shapefiles/dreisam_hq100.shp"
dreisam_hq100 = create_shp(shp_dir, layer_name="basemap", layer_type="polygon")

# create .prj file for the shapefile for GIS map applications
with open(shp_dir.split(".shp")[0] + ".prj", "w+") as prj:
    prj.write(get_wkt(25832))

# get basemap layer
lyr = dreisam_hq100.GetLayer()

# add string field "tbg_name"
lyr.CreateField(ogr.FieldDefn("tbg_name", ogr.OFTString))

# add string field "area"
lyr.CreateField(ogr.FieldDefn("area", ogr.OFTReal))

for wkt, tbg in zip(dreisam_inundation["wkt_geom"], dreisam_inundation["TBG_NAME"]):
    # create Feature as child of the layer
    feature = ogr.Feature(lyr.GetLayerDefn())
    # assign tbg_name
    feature.SetField("tbg_name", tbg)
    # use WKT format to add a polygon geometry to the Feature
    polygon = ogr.CreateGeometryFromWkt(wkt)
    # define default value of 0 to the area field
    feature.SetField("area", polygon.GetArea())

    feature.SetGeometry(polygon)
    # append the new feature to the basemap layer
    lyr.CreateFeature(feature)

lyr = None
dreisam_hq100 = NoneAlso GeoJSON data can be used to create an ogr.Geometry with ogr.createFromGeoJson(FILENAME):
from osgeo import ogr
geojson_data = """{"type":"Point","coordinates":[1013452.282805,6231540.674235]}"""
point = ogr.CreateGeometryFromJson(geojson_data)
print("X=%d, Y=%d (EPSG:3857)" % (point.GetX(), point.GetY()))
X=1013452, Y=6231540 (EPSG:3857)
Geometrische Attribute berechnen
The above code block illustrates the usage of polygon.GetArea() to calculate the polygon area in m. The ogr library provides many more functions to calculate geometric attributes of features and here is a summary:
Mehrere Polygone vereinheitlichen
wkt_... = ...
polygon_a = ogr.CreateGeometryFromWkt(wkt_1)
polygon_b = ogr.CreateGeometryFromWkt(wkt_2)
polygon_union = polygon_a.Union(polygon_b)Schnitt zwei Polygone
polygon_intersection = polygon_a.Intersection(polygon_b)Envelope (minimum and maximum extents) of a polygon
env = polygon.GetEnvelope()
print("minX: %d, minY: %d, maxX: %d, maxY: %d" % (env[0],env[2],env[1],env[3])Konvexer Rumpf (Hüllfläche) mehrerer Geometrien (Punkte, Linien, Polygone)
all_polygons = ogr.Geometry(ogr.wkbGeometryCollection)
for feature in POLYGON-SOURCE-LAYER: all_polygons.AddGeometry(feature.GetGeometryRef())
convexhull = all_polygons.ConvexHull()
Saveconvexhullto shapefile (use thecreate_shpfunction as shown in the above examples or read more at pcjericks’ Github pages)
Tip: To create a tight hull (e.g., of a point cloud), look forconcavehullfunctions.Länge (einer Linie)
wkt = "LINESTRING (415128.5 5320979.5, 415128.6 5320974.5, 415129.75 5320974.7)"
line = ogr.CreateGeometryFromWkt(wkt)
print("Length = %d" % line.Length())Area (of a polygon):
polygon.GetArea()(see above example)Beispiel für die Berechnung von Zentrumskoordinaten von Polygons].
Export in andere Formate
The above examples deal with .shp files only, but other formats can be useful (e.g., to create web applications or export to Google Earth). To this end, the following paragraphs illustrate the creation of GeoJSON and KML files. Several other conversions can be performed, not only between file formats but also between feature types. For instance, polygons can be created from point clouds (among others with the ConvexHull method mentioned above). Interested students can learn more about conversions in Michael Diener’s Python Geospatial Analysis Cookbook.
GeoJSON
GeoJSON-Dateien können einfach wie zuvor erstellt werden, auch ohne einen Treiber zu aktivieren:
triangle = ogr.Geometry(ogr.wkbLinearRing)
triangle.AddPoint(-11717151.498691, 2356192.894805)
triangle.AddPoint(-11717120.446149, 2355586.175893)
triangle.AddPoint(-11719392.059083, 2354012.050842)

polygon = ogr.Geometry(ogr.wkbPolygon)
polygon.AddGeometry(triangle)

with open(r"" + os.path.abspath('') + "/geodata/geojson/pitillal-triangle.geojson", "w+") as gjson:
    gjson.write(polygon.ExportToJson())
For more robust file handling and defining a projection, activate the driver ogr.GetDriverByName("GeoJSON"). Thus, the creation and manipulation of GeoJSON files work similarly to the shapefile handlers shown above.
gjson_driver = ogr.GetDriverByName("GeoJSON")

# make spatial reference
sr = osr.SpatialReference()
sr.ImportFromEPSG(3857)

# create GeoJSON file
gjson = gjson_driver.CreateDataSource("pitillal-full.geojson")
gjson_lyr = gjson.CreateLayer("pitillal-full.geojson", geom_type=ogr.wkbPolygon, srs=sr)

# get layer feature definitions
feature_def = gjson_lyr.GetLayerDefn()
# create new feature
new_feature = ogr.Feature(feature_def)
# assign the triangle from the above code block
new_feature.SetGeometry(polygon)
# add new feature to Layer
gjson_lyr.CreateFeature(new_feature)

# close links to data sources
gjson = None
gjson_lyr = None
KML (Google Earth)
Um Punkt-, Linien- oder Polygonfunktionen in Google Earth anzuzeigen, können Funktionen in Googles KML (Keyhole Markup Language) eingefügt werden, ähnlich der Erstellung einer GeoJSON-Datei und mit der Funktion geometry.ExportToKML:
triangle = ogr.Geometry(ogr.wkbLinearRing)
triangle.AddPoint(-11717151.498691, 2356192.894805)
triangle.AddPoint(-11717120.446149, 2355586.175893)
triangle.AddPoint(-11719392.059083, 2354012.050842)

polygon = ogr.Geometry(ogr.wkbPolygon)
polygon.AddGeometry(triangle)

#geojson = poly.ExportToJson()
with open(r"" + os.path.abspath("") + "/geodata/pitillal-triangle.kml", "w+") as gjson:
    gjson.write(polygon.ExportToKML())
Darüber hinaus können KML-Dateien ähnlich wie GeoJSON-Dateien und Shapefiles robuster generiert werden (z. B. mit einer definierten Projektion). Sie müssen lediglich den KML-Treiber (kml_driver = ogr.GetDriverByName("KML")) initiieren und eine KML-Datenquelle (kml_file = kml_driver.CreateDataSource(FILENAME.KML)) definieren.