Vorwort
Dieses Tutorial führt Sie durch die Installation von öffne TELEMAC-MASCARET auf Debian Linux-basierten Systemen (einschließlich Ubuntu und Derivaten wie Linux Mint).] **Planen Sie ungefähr 1-2 Stunden und eine stabile Internetverbindung; die Downloads überschreiten 1,4 GB. **
Dieser Abschnitt deckt nur die installation von TELEMAC ab. Für Tutorials zum Ausführen von hydro(-morpho)dynamischen Modellen mit TELEMAC siehe TELEMAC tutorials section.
Es stehen einige Installationsoptionen zur Verfügung:
Lesen Sie weiter und gehen Sie durch die folgenden Abschnitte.
If you are using the Mint Hyfo Virtual Machine, you can skip the setup tutorials here. TELEMAC v8p3 is already installed and configured, so you can proceed directly to the TELEMAC tutorials. Treat this VM as a training environment: it is great for learning and running sample cases, but it is not intended for performance-critical, application-scale modeling.
Laden Sie die TELEMAC-Umgebung und prüfen Sie, ob sie funktioniert mit:
cd ~/telemac/v8p3/configs
source pysource.hyfo.sh
config.py
TELEMAC ist auch über die SALOME-HYDRO Software-Suite erhältlich, die ein Spin-Off von SALOME ist. Die Hauptfunktionalitäten von SALOME-HYDRO können jedoch auf ein neues QGIS-Plugin migriert werden. Daher empfiehlt dieses eBook, TELEMAC unabhängig von Vor- oder Nachbearbeitungssoftware zu installieren.
Das österreichische Ingenieurbüro Flussplan stellt einen Docker-Container von TELEMAC v8 auf seinem docker-telemac GitHub repository] zur Verfügung. Beachten Sie, dass ein Docker-Container eine einfach zu installierende virtuelle Umgebung darstellt, die plattformübergreifende Kompatibilität nutzt, aber die Rechenleistung beeinflusst. Wenn Sie die proprietäre Docker-Software installiert haben und die Rechenleistung nicht das Hauptanliegen Ihrer Modelle ist, ist der Docker-Container von Flussplan möglicherweise eine gute Wahl. Zum Beispiel werden rein hydrodynamische Modelle mit einer geringen Anzahl von Netzknoten und ohne zusätzliche TELEMAC-Modul-Implikationen effizient im Docker-Container laufen.
Grundanforderungen
Admin (sudo) rights required for installing basic and optional requirements
Superuser privileges (sudo for super doers list) are required for many steps in this workflow, such as installing packages, editing system configuration, and writing to system directories. On Debian, sudo access is typically granted by installing sudo, adding your account to the sudo group, and managing permissions safely with visudo (which edits /etc/sudoers). For detailed setup instructions, see the tutorial Debian Linux and talk to your system administrator.
Die Arbeit mit TELEMAC erfordert Software, um Quelldateien herunterzuladen, zu kompilieren und das Programm auszuführen. Die obligatorischen Softwarevoraussetzungen für die Installation von TELEMAC unter Debian Linux] werden in den folgenden Abschnitten erläutert.
Python3
Geschätzte Dauer: 5-8 Minuten.
Python3 wurde standardmäßig seit Version 10 (Buster) unter Debian installiert und es ist erforderlich, die Compiler/Launcher-Skripte von TELEMAC auszuführen. Um Python3 zu starten, öffnen Sie ein Terminal und führen Sie python3 aus; zum Beenden verwenden Sie exit() oder drücken Sie Ctrl+D.
TELEMAC benötigt die NumPy-Bibliothek; die meisten Workflows verlassen sich auch auf SciPy und Matplotlib]. Da TELEMAC nicht standardmäßig ist, helfen Python-Header und eine saubere Umgebung.
Um die gemeinsamen Systempakete zu installieren, führen Sie aus:
sudo apt update
sudo apt install python3-numpy python3-scipy python3-matplotlib python3-pip python3-dev python3-venv
Got Qt Errors?
Wenn während der Installation ein Fehler auftritt, installieren Sie die erweiterten Abhängigkeiten (inklusive Qt) mit dem folgenden Befehl:
sudo apt install libgl1-mesa-glx libegl1-mesa libxrandr2 libxrandr2 libxss1 libxcursor1 libxcomposite1 libasound2 libxi6 libxtst6Dann versuchen Sie erneut, die Bibliotheken zu installieren.
Wenn Sie sich auf einer älteren Debian-Version befinden, die distutils im Standard-Python nicht enthält, installieren Sie auch python3-distutils.
Um zu testen, ob die Installation erfolgreich war, geben Sie python3 in Terminal ein und importieren Sie die drei Bibliotheken:
Python 3.11.1 (default, Jul  25 2030, 13:03:44) [GCC 9.3.0] on linux
Type "help", "copyright", "credits" or "license" for more information.
>>> import numpy
>>> a = numpy.array((1, 1))
>>> print(a)
[1 1]
>>> exit()
None of the three library imports should return an ImportError message. To learn more about Python read the section on Pakete, Module und Bibliotheken.
Gips
Geschätzte Dauer: <5 Minuten.
Installation and usage of Git are covered in the git section of this eBook. In addition to what is described there, you will need Git Large File Storage (Git LFS) to handle large assets if a TELEMAC-related repository uses it. On Debian, you usually only need git (not git-all, which pulls many extras), plus git-lfs. Install and initialize:
sudo apt update
sudo apt install git git-lfs
git lfs install
git lfs install sets up LFS for your user account; so it is harmless even if a given repository does not use LFS.
GNU Fortran 95 Compiler (gfortran)
Geschätzte Dauer: 3-10 Minuten.
Das Python-basierte Build-System von TELEMAC erfordert einen Fortran-Compiler; die übliche Wahl auf Debian ist der GNU Fortran-Compiler (gfortran), der rückwärtskompatibel mit GNU Fortran 95 ist und neuere Standards unterstützt. Debian stellt gfortran aus seinen Standard-Repositories zur Verfügung. Um es zu installieren, ein Terminal öffnen und ausführen:
sudo apt update
sudo apt install gfortran
After installation, verify your setup with gfortran --version; the compiler must be on your PATH for TELEMAC’s scripts to find it.
If the gfortran installation fails...
Ensure the standard Debian “main” component is enabled in your APT sources so the gfortran package is available. Edit /etc/apt/sources.list as root (or add a file in /etc/apt/sources.list.d/), then run sudo apt update. Verify availability with apt-cache policy gfortran or apt search gfortran; note that gfortran is a metapackage that installs the current default version (for example, gfortran-12 or gfortran-13). Package details are listed here: https://
Mehr Compiler und Wesentliche
Geschätzte Dauer: 2-5 Minuten.
For building TELEMAC and its dependencies, you need C/C++ and CMake. Install Debian’s build-essential (which provides gcc, g++, and make) and cmake; these are required to compile sources, including parallel (MPI) builds, though MPI itself is provided by packages like OpenMPI that you will install later. The dialog package is optional but useful because some helper scripts use simple text interfaces. For editing shell scripts you can use gedit (read more, or alternatives such as Nano or Vim). Run:
sudo apt update
sudo apt install -y build-essential cmake dialog gedit gedit-plugins
Installationspfad einrichten
Bis zu diesem Zeitpunkt wurde Software über Debians Paketmanager (APTITUDE, apt) installiert. Im Gegensatz dazu wird TELEMAC aus seinem GitLab-Repository in ein von Ihnen gewähltes Verzeichnis heruntergeladen (d.h. git-cloned). Sein Build/Installations-Workflow ist eindeutig nicht standardmäßig, so dass Pfadentscheidungen wichtig sind. Wählen Sie eines der folgenden Setups aus:
Einzelner Benutzer ohne Admin-Rechte:
ROOT=/home/<USERNAME>/opt(dhROOT=$HOME/opt) (XDG-konforme Alternative:ROOT=$HOME/.local)Gemeinsame Nutzung ohne root: nur wenn bereits ein gruppenbeschreibbarer Standort existiert, z. B. eine NFS-Freigabe wie
ROOT=/srv/shared/telemacSystemweit (Administrator erforderlich) auf Debian-basierten Systemen: bevorzugt
ROOT=/usr/local(Binärdateien in/usr/local/bin, Bibliotheken in/usr/local/lib);ROOT=/optist auch für einen in sich geschlossenen Baum akzeptabel
In the sections that follow, we demonstrate a single-user installation of TELEMAC (including SALOME) with ROOT=/home/HyInfo/opt.
Holen Sie sich die TELEMAC Repo
Geschätzte Dauer: 25-40 Minuten (große Downloads).
Holen Sie sich die TELEMAC-Quellen mit Git-LFS. Erstellen oder wählen Sie im Terminal Ihr Arbeitsverzeichnis (hier: /home/HyInfo/opt - siehe oben) und ändern Sie es (cd); zum Beispiel:
cd /home/HyInfo/opt
git clone https://gitlab.pam-retd.fr/otm/telemac-mascaret.git
This clones the repository into a subdirectory named telemac-mascaret. For faster downloads you may use a shallow clone with --depth=1, understanding that this limits history.
There are many (experimental) branches of TELEMAC available
The TELEMAC git repository provides many other TELEMAC versions in the form of development or old-version branches. For instance, the following clones the upwind_gaia branch to a local sub-folder called telemac/gaia-upwind. After cloning this single branch, compiling TELEMAC can be done as described in the following.
git clone -b upwind_gaia --single-branch https://gitlab.pam-retd.fr/otm/telemac-mascaret.git telemac/gaia-upwindLesen Sie mehr über das Klonen einzelner TELEMAC-Zweige im TELEMAC wiki].
Identifizieren Sie nach dem Klonen des Repositorys die zuletzt markierte Version. Aktualisieren Sie zuerst Ihre Tagliste und zeigen Sie verfügbare Versionen an:
cd telemac-mascaret
git fetch --tags
git tag -l
Seit November 2025 ist die letzte offizielle Veröffentlichung, die auf der GitLab-Seite “Releases” veröffentlicht wurde, v9.0.0. Schauen Sie sich das genaue Tag an (entfernter HEAD) oder erstellen Sie einen Branch daraus:
git checkout tags/v9.0.0Wenn ein neueres Tag später erscheint, ersetzen Sie seinen Namen entsprechend.
Optionale Anforderungen (Parallelismus und andere)
This section walks you through installing additional packages required for parallel execution and working with SALOME's .med files. Confirm that the Terminal finds gcc (typically installed via build-essential) by running gcc --version. The packages below enable parallelism and provide substantial speedups for simulations:
Message Passing Interface (MPI)
Metis
Systemweite Installation
Installieren Sie Voraussetzungen für MPI, Metis, HDF5, MED und MUMPS. Paketnamen unterscheiden sich leicht zwischen Debian- und Ubuntu-Derivaten (Mint), verwenden Sie also das unten stehende Matching-Set.
Debian (aktuell stabil und Test):
sudo apt update
sudo apt install -y libopenmpi-dev openmpi-bin libhdf5-dev hdf5-tools libmetis-dev libmetis5 libmumps-dev libmumps-seq-dev libscalapack-openmpi-dev libmedc-dev libmed-tools
Ubuntu und Derivate (aktivieren Universe first, wenn noch nicht fertig):
sudo add-apt-repository -y universe
sudo apt update
sudo apt install -y sudo apt install -y libmedc11t64 libmedc-dev libmed-tools libmed11 libmed-dev libmedimport0v5 libmedimport-dev libopenmpi-dev openmpi-bin libhdf5-dev hdf5-tools libmetis-dev libmumps-seq-dev libmumps-dev libscalapack-openmpi-dev
Anmerkungen:
libopenmpi-devandopenmpi-binprovide MPI headers andmpirun/mpiexec.libmetis-devliefert den Partitioner, den TELEMACpartelverwenden kann.libhdf5-devwird von MED benötigt;libmedc-devundlibmed-toolsbieten MED-I/O-Unterstützung, die von SALOME-generierten Meshes verwendet wird.libmumps-devundlibscalapack-openmpi-devsind gängige Solver-Backends für große, parallele Läufe.
If your release uses “t64” suffixed packages (for example, libmedc11t64), accept those names as offered by apt.
What is behind this (for the blue detail lovers)?
Parallelismus: MPI und Metis
Um sich nicht auf Distributionspakete zu verlassen, holen die folgenden Befehle eine gepflegte Abzweigung von METIS, die für TELEMAC-Builds vorbereitet ist. Führen Sie als normaler Benutzer:
cd ~/telemac/optionals
git clone https://github.com/hydro-informatics/metis.git
cd metis
Dieses Repository enthält eine Abzweigung von Karypis Labs GKlib, die zuerst erstellt werden muss:
cd GKlib
make config cc=gcc prefix=~/telemac/optionals/metis/GKlib openmp=set
make
make install
cd ..
Edit ~/telemac/optionals/metis/Makefile and set at the top:
prefix = ~/telemac/optionals/metis/build/
cc = gcc
Dann bauen und installieren Sie Metis:
make config
make
make install
HDF5 für MED Format Handler
HDF5 ist die zugrunde liegende I/O-Bibliothek, die von MED verwendet wird. Um ein bestimmtes HDF5-Release zu kompilieren, konfigurieren Sie es für die Installation unter einem Nicht-System-Präfix und exportieren Sie Pfade in Ihrem Shell-Profil. Beispiel (Version und Präfix nach Bedarf anpassen):
# build as a normal user
./configure --prefix=$HOME/opt/hdf5
make
make install

# add to your environment
echo 'export PATH=$HOME/opt/hdf5/bin:$PATH' >> ~/.bashrc
echo 'export LD_LIBRARY_PATH=$HOME/opt/hdf5/lib:$LD_LIBRARY_PATH' >> ~/.bashrc
source ~/.bashrc

# verify
h5cc -showconfig
***MED-Dateibibliothek ***
The MED library (from the SALOME ecosystem) provides mesh/result I/O used by many TELEMAC workflows. To build MED yourself, ensure its HDF5 version matches the one used at compile time and disable Python bindings unless you also satisfy the required SWIG/Python headers. Then build it:
./configure --prefix=$HOME/telemac/optionals/med-4.1.1 --disable-python
make
make install
Anmerkungen:
--disable-pythonvermeidet SWIG-Versionskonflikte; das Aktivieren von Python erfordert passendepython3-dev-Header und eine kompatible SWIG-Version.Die Kompatibilität der MED-Version mit Ihrem HDF5-Build ist entscheidend; das Mischsystem HDF5 mit einem benutzerdefinierten MED (oder umgekehrt) unterbricht häufig TELEMAC I / O.
Wenn Sie temporäre Build-Verzeichnisse erstellt haben, können Sie diese entfernen:
cd ~/telemac/optionals
rm -rf tempSALOME
Dieser Workflow erklärt die Installation von SALOME unter Linux Mint / Ubuntu. Die Mindestlaufzeitabhängigkeiten erfordern (mindestens) folgende Installationen:
sudo apt update
sudo apt install python3-pytest-cython python3-sphinx python3-alabaster python3-cftime libcminpack1 python3-docutils libfreeimage3 python3-h5py python3-imagesize liblapacke clang python3-netcdf4 libnlopt0 libnlopt-cxx0 python3-nlopt python3-nose python3-numpydoc python3-patsy python3-psutil libtbb12 libxml++2.6-2v5 liblzf1 python3-stemmer python3-sphinx-rtd-theme python3-sphinxcontrib.websupport sphinx-intl python3-statsmodels python3-toml python-is-python3
Die minimalen Compil-Abhängigkeiten erfordern folgende Installationen:
sudo apt update
sudo apt install pyqt5-dev pyqt5-dev-tools libboost-all-dev libcminpack-dev libcppunit-dev doxygen libeigen3-dev libfreeimage-dev libgraphviz-dev libjsoncpp-dev liblapacke-dev libxml2-dev llvm-dev libnlopt-dev libnlopt-cxx-dev python3-patsy libqwt-qt5-dev libfontconfig1-dev libglu1-mesa-dev libxcb-dri2-0-dev libxkbcommon-dev libxkbcommon-x11-dev libxi-dev libxmu-dev libxpm-dev libxft-dev libicu-dev libsqlite3-dev libxcursor-dev libtbb-dev libqt5svg5-dev libqt5x11extras5-dev qtxmlpatterns5-dev-tools libpng-dev libtiff5-dev libgeotiff-dev libgif-dev libgeos-dev libgdal-dev texlive-latex-base libxml++2.6-dev libfreetype6-dev libgmp-dev libmpfr-dev libxinerama-dev python3-sip-dev python3-statsmodels tcl-dev tk-dev
Bestätigen Sie Ihre Linux Version:
Debian: cat /etc/os-release
Minze:
lsb_release -aUbuntu:
inxi -Sx(funktioniert auch auf Mint)
Laden Sie den SALOME Build herunter
Gehen Sie zum offiziellen SALOME-Downloadformular]
Wählen Sie die neueste Version mit dem Ubuntu-Build (die der Mint-Basis entspricht); oder wählen Sie die weniger häufig aktualisierte “Linux Universal”
Verify the checksum: from SALOME’s md5 page, fetch the matching
.md5file for your archive and verify locallyBeispiel für den 9.15 Tarball: im Download-Verzeichnis des Tarballs laufen
md5sum SALOME-9.15.0.tar.gz(Terminal)Gehen Sie zu SALOMEs md5 page], wählen Sie die entsprechende md5-Datei aus und überprüfen Sie, ob ihr Inhalt genau der Antwort des Terminals entspricht.
** Überspringen Sie das nicht! **
Extract somewhere clean and sane; for example as
sudofor the entire system (adjust name if you chose a different archive), or following this workflow fow installing TELEMAC in/home/HyInfo/opt/:mkdir -p /home/HyInfo/opt/salome tar -xzf ~/Downloads/SALOME-9.15.0.tar.gz -C /opt/salome --strip-components=1 chown -R "$USER":"$USER" /home/HyInfo/opt/salome
Troubleshoot “chown: invalid group: ...”
If you are receiving a message like chown: invalid group: myuser:myuser, that means chown is complaining because there is no group named myuser on the computer. The owner myuser exists, but the group myuser does not. To fix that, first check your actual primary group:
idThis should return something like uid=1234(myuser) gid=100(users) groups=100(users),123(othergroup). Now you have two options for troubleshooting:
Option 1: Ersetzen Sie die zweite $USER durch Ihre primäre Gruppe von id:
chown -R "$USER":"$(id -gn "$USER")" /home/HyInfo/opt/salomeOption 2 (robuster): Verwenden Sie die automatische Erkennung Ihrer primären Gruppe:
chown -R "$USER":"$(id -gn "$USER")" /home/HyInfo/opt/salomeLassen Sie SALOME Ihr System überprüfen und installieren, wonach es verlangt
Identifizieren Sie im extrahierten SALOME-Verzeichnis den Anwendungsnamen
cd /home/HyInfo/opt/salome/sat
./sat config --list
Verwenden Sie den angegebenen Anwendungsnamen; die folgenden Beschreibungen gehen davon aus, dass der Anwendungsname
SALOME-9.15.0-nativelautet.Führen Sie den eingebauten Checker aus; er druckt aus, welche Pakete möglicherweise fehlen:
cd /home/HyInfo/opt/salome/sat
./sat config SALOME-9.15.0-native --check_system
Install the packages it lists via
apt, then rerun the check until it is clean.
Stellen Sie sicher, dass 3D / OpenGL in Ordnung ist: Überprüfen Sie den richtigen Treiberstapel (insbesondere für NVIDIA) vor dem Start; Lesen Sie mehr auf SALOME PLATFORM FAQ]
Starten Sie SALOME aus dem Ordner SALOME:
if in the
/satsubfolder first typecd ..Lauf Salome:
./salome
Wenn Sie auf Berechtigungsfehler stoßen, stellen Sie sicher, dass Sie an einen Ort extrahiert haben, den Sie besitzen, oder beheben Sie das Eigentum. Einige Benutzer hatten Probleme mit ungeraden Standorten oder WSL; halten Sie sich an einen normalen Dateisystempfad, den Sie kontrollieren.
Es gibt auch eine Containeroption: Man kann SALOME über Docker/Apptainer ausführen, aber die ParaViS/ParaView-Beschleunigung in Containern ist notorisch fehlerhaft und bricht oft; das SALOME-Forum dokumentiert das Rendern von Problemen in Docker.
Compiler TELEMAC
Anpassung und Überprüfung der Konfigurationsdatei (systel.x.cfg)
Geschätzte Dauer: 2-20 Minuten.
The systel.x.cfg file tells TELEMAC how to compile and launch its modules on your computer. More specifically, it is TELEMAC’s central configuration that defines builds and runtime environments, including compilers, compiler flags, MPI and related options, external libraries, and paths. In practice we use this file to declare flags and to point TELEMAC to optional dependencies. By default, TELEMAC looks for configuration files under ./configs/ (for example configs/systel.cfg), and one can override the path with the SYSTELCFG environment variable or the -f option of the Python launcher.
This section describes the setup of systel.x.cfg for:
Linux Mint 22 (getestet) und Ubuntu 24.04 (erwartet identisch, noch nicht getestet)
Debian 12 (Testing in Progress)
Recall that we describe the single-user installation of TELEMAC under the local home directory /home/HyInfo/opt/telemac-mascaret and that we installed SALOME in /home/HyInfo/opt/salome.
Beachten Sie, dass wir weder die API noch die AED2 (waqtel) und GOTM (general ocean) Module aktiviert haben.
Our cfg and pysource files define a single build (e.g., hyinfompiubu on Mint / Ubuntu) for TELEMAC v9.0, enabling mpi and dyn options and using GNU compilers (cc=mpicc, fc=mpifort backed by gfortran). External libraries are linked via include and library blocks for OpenMPI, HDF5, MED (via SALOME), METIS, and MUMPS with ScaLAPACK, BLAS, and LAPACK. RPATH entries are added so the runtime can locate HDF5 and related libraries, using paths that match typical Debian and Ubuntu layouts.
The following configuration provides a TELEMAC configuration called hyinfompiubu. It enables optimized core flags, position-independent builds, and big-endian unformatted I/O with modified record markers, plus MPI settings on Linux Mint 22 / Ubuntu 24.04. Executables are launched with mpirun -np <ncsize>, and meshes are partitioned using partel. Build artifacts are placed under <root>/builds/hyinfompiubu/{bin,lib,obj}, and the file also defines suffixes, validation paths, and Python F2PY settings (f2py, gnu95).
Um es für die Zusammenstellung von TELEMAC zu verwenden:
Laden Sie systel.mint22.cfg] aus unserem GitHub-Repository herunter oder kopieren Sie die Dateiinhalte unten in den TELEMAC
/configs-Ordner, hier:/home/HyInfo/opt/telemac-mascaret/configs.Öffnen Sie
systel.mint22.cfgin einem Texteditor (z. B. gedit) und ersetzen Sie die beiden/home/HyInfo/opt/salomePfadintances durch Ihren SALOME Installationspfad.Überprüfen Sie die Installationspfade von Optionalen, insbesondere HDF5, MED und Mumps.
Save
systel.mint22.cfgand close the text editor.
# _____                              _______________________________
# ____/ TELEMAC Project Definitions /______________________________/
#
[Configurations]
configs: hyinfompiubu
#
# _____          _________________________________________________
# ____/ General /_________________________________________________/
#
[general]
language: 2
modules:  system
version:  9.0
options:  mpi dyn
hash_char: #
# Suffixes
sfx_zip:  .tar.gz
sfx_lib:  .a
sfx_obj:  .o
sfx_exe:
sfx_mod:  .mod
# Validation paths
val_root:      <root>/examples
val_rank:      all
# Compilers
cc:      mpicc
cflags:  -fPIC -O3
fc:      mpifort
# Core Fortran flags; TELEMAC expects big-endian unformatted files
fflags:  -cpp -O3 -fPIC -fconvert=big-endian -frecord-marker=4 -DHAVE_MPI
# Build commands
cmd_obj_c: [cc] [cflags] -c <srcName> -o <objName>
cmd_obj:   [fc] [fflags] -c <mods> <incs> <f95name>
cmd_lib:   ar cru <libname> <objs>
cmd_exe:   [fc] [fflags] -o <exename> <objs> <libs>
# Splitter and MPI run
par_cmdexec:   <config>/partel < <partel.par> >> <partel.log>
mpi_cmdexec:   mpirun -np <ncsize> <exename>
mpi_hosts:
# ----- Optional library blocks merged in libs_all / incs_all -----
# OpenMPI include dir (Ubuntu 24.04)
inc_mpi:       -I /usr/lib/x86_64-linux-gnu/openmpi/include
# HDF5 (Ubuntu serial headers; change to /usr/include/hdf5/openmpi if using libhdf5-openmpi-dev)
inc_hdf5:  -I /usr/include/hdf5/openmpi
libs_hdf5: -L /usr/lib/x86_64-linux-gnu/hdf5/openmpi -lhdf5_fortran -lhdf5hl_fortran -lhdf5_hl -lhdf5
ldflags_opt:   -Wl,-rpath,/usr/lib/x86_64-linux-gnu/hdf5/openmpi
ldflags_debug: -Wl,-rpath,/usr/lib/x86_64-linux-gnu/hdf5/openmpi

# MED (from SALOME packages)
inc_med:       -I /home/HyInfo/opt/salome/BINARIES-UB24.04/medfile/include
libs_med:      -L /home/HyInfo/opt/salome/BINARIES-UB24.04/medfile/lib -lmedC -lmed -lmedimport
# METIS
inc_metis:     -I /usr/include
libs_metis:    -L /usr/lib/x86_64-linux-gnu -lmetis
# MUMPS + ScaLAPACK (MPI build)
inc_mumps:     -I /usr/include
libs_mumps:    -L /usr/lib/x86_64-linux-gnu -ldmumps -lmumps_common -lpord -lscalapack-openmpi -lblas -llapack
# Aggregate include and library flags
incs_all: [inc_mpi] [inc_hdf5] [inc_med] [inc_metis] [inc_mumps]
libs_all: [libs_hdf5] [libs_med] [libs_metis] [libs_mumps]

# ===== Build section =====
[hyinfompiubu]
brief: Ubuntu 24.04 gfortran + OpenMPI + MED/HDF5 + METIS + MUMPS/ScaLAPACK
system: linux
mpi:   openmpi
compiler: gfortran
pyd_fcompiler: gnu95
f2py_name: f2py
# build tree under <root>=HOMETEL
bin_dir: <root>/builds/hyinfompiubu/bin
lib_dir: <root>/builds/hyinfompiubu/lib
obj_dir: <root>/builds/hyinfompiubu/obj
# override/extend general flags if needed
options: mpi dyn
cmd_obj:   [fc] [fflags] -c <mods> <incs> <f95name>
cmd_lib:   ar cru <libname> <objs>
cmd_exe:   [fc] [fflags] -o <exename> <objs> <libs>
# inherit mods_all/incs_all/libs_all from [general]
mods_all:  -I <config>
The following configuration provides a TELEMAC configuration called hyinfompideb12. It enables optimized core flags, position-independent builds, and big-endian unformatted I/O with modified record markers, plus MPI settings on Debian 12. Executables are launched with mpirun -np <ncsize>, and meshes are partitioned using partel. Build artifacts are placed under <root>/builds/hyinfompideb12/{bin,lib,obj}, and the file also defines suffixes, validation paths, and Python F2PY settings (f2py, gnu95).
Um es für die Zusammenstellung von TELEMAC zu verwenden:
Laden Sie systel.debian12.cfg] aus unserem GitHub-Repository herunter oder kopieren Sie die Dateiinhalte unten in den TELEMAC
/configs-Ordner, hier:/home/HyInfo/opt/telemac-mascaret/configs.Öffnen Sie
systel.debian12.cfgin einem Texteditor (z. B. gedit) und ersetzen Sie die beiden/home/HyInfo/opt/salomePfadintances durch Ihren SALOME Installationspfad.Überprüfen Sie die Installationspfade von Optionalen, insbesondere HDF5, MED und Mumps.
Save
systel.debian12.cfgand close the text editor.
Wo Pakete typischerweise auf Debian 12 leben:
OpenMPI Wrapper und Launcher:
/usr/bin/mpifort,/usr/bin/mpicc,/usr/bin/mpirunoder/usr/bin/mpiexec.Parallel HDF5: headers are in
/usr/include/hdf5/openmpi, libs in/usr/lib/x86_64-linux-gnu/hdf5/openmpivialibhdf5-openmpi-dev.METIS/ParMETIS: Header sind unter
/usr/include; libs unter/usr/lib/x86_64-linux-gnu.
# _____                              _______________________________
# ____/ TELEMAC Project Definitions /______________________________/
#
[Configurations]
configs: hyinfompideb12
#
# _____          _________________________________________________
# ____/ General /_________________________________________________/
#
[general]
language: 2
modules:  system
version:  9.0
options:  mpi dyn
hash_char: #
# Suffixes
sfx_zip:  .tar.gz
sfx_lib:  .a
sfx_obj:  .o
sfx_exe:
sfx_mod:  .mod
# Validation paths
val_root:      <root>/examples
val_rank:      all
# Compilers (use MPI wrappers on Debian 12/OpenMPI)
cc:      mpicc
cflags:  -fPIC -O3
fc:      mpifort
# Core Fortran flags; TELEMAC expects big-endian unformatted files
fflags:  -cpp -O3 -fPIC -fconvert=big-endian -frecord-marker=4 -DHAVE_MPI
# Build commands
cmd_obj_c: [cc] [cflags] -c <srcName> -o <objName>
cmd_obj:   [fc] [fflags] -c <mods> <incs> <f95name>
cmd_lib:   ar cru <libname> <objs>
cmd_exe:   [fc] [fflags] -o <exename> <objs> <libs>
# Splitter and MPI run
par_cmdexec:   <config>/partel < <partel.par> >> <partel.log>
mpi_cmdexec:   mpirun -np <ncsize> <exename>

# ===== Common includes/libs for Debian 12 (OpenMPI / HDF5-openmpi / MED / METIS / MUMPS / ScaLAPACK) =====
# MPI headers (OpenMPI)
inc_mpi:       -I /usr/lib/x86_64-linux-gnu/openmpi/include

# HDF5 parallel (from libhdf5-openmpi-dev)
inc_hdf5:      -I /usr/include/hdf5/openmpi
libs_hdf5:     -L /usr/lib/x86_64-linux-gnu/hdf5/openmpi -lhdf5_fortran -lhdf5hl_fortran -lhdf5_hl -lhdf5

# MED-fichier (from SALOME)
inc_med:       -I /home/HyInfo/opt/salome/BINARIES-DB12/medfile/include
libs_med:      -L /home/HyInfo/opt/salome/BINARIES-DB12/medfile/lib -lmedC -lmed -lmedimport

# METIS (from libmetis-dev)
inc_metis:     -I /usr/include
libs_metis:    -L /usr/lib/x86_64-linux-gnu -lmetis

# MUMPS + ScaLAPACK (OpenMPI build)
inc_mumps:     -I /usr/include
libs_mumps:    -L /usr/lib/x86_64-linux-gnu -ldmumps -lmumps_common -lpord -lscalapack-openmpi -lblas -llapack

# Aggregate libraries used by TELEMAC link step
libs_all: [libs_hdf5] [libs_med] [libs_metis] [libs_mumps]

# ===== Build section =====
[hyinfompideb12]
brief: Debian 12 gfortran + OpenMPI + MED/HDF5 + METIS + MUMPS/ScaLAPACK
system: linux
mpi:   openmpi
compiler: gfortran
pyd_fcompiler: gnu95
f2py_name: f2py
# Build tree under <root>=HOMETEL
bin_dir: <root>/builds/hyinfompideb12/bin
lib_dir: <root>/builds/hyinfompideb12/lib
obj_dir: <root>/builds/hyinfompideb12/obj
# Override/extend general flags if needed
options: mpi dyn
cmd_obj:   [fc] [fflags] -c <mods> <incs> <f95name>
cmd_lib:   ar cru <libname> <objs>
cmd_exe:   [fc] [fflags] -o <exename> <objs> <libs>
# Inherit mods_all/incs_all/libs_all from [general]
mods_all:  -I <config>
incs_all:  [inc_mpi] [inc_hdf5] [inc_med] [inc_metis] [inc_mumps]
libs_all:  [libs_hdf5] [libs_med] [libs_metis] [libs_mumps]
# rpath for HDF5-openmpi so executables run without extra env
ldflags_opt:   -Wl,-rpath,/usr/lib/x86_64-linux-gnu/hdf5/openmpi
ldflags_debug: -Wl,-rpath,/usr/lib/x86_64-linux-gnu/hdf5/openmpi
The following explanations provide guidance on customizing a cfg file and reference available templates in TELEMAC’s /configs folder. These instructions are intended for users who did not use apt-installations of OpenMPI, MUMPS, Metis, and HDF5 (see info box in the installation instructions for optionals.
A typical systel.*.cfg file has:
An optional
[Configurations]list enumerating available build sections.A
[general]section with defaults.One or more build sections like
[debgfopenmpi]that inherit from[general]and override specifics. TELEMAC ships example configs such assystel.edf.cfgwith these patterns.
Die richtige Konfigurationsvorlage finden und auswählen:
TELEMAC ships example config files in
<root>/configs(e.g.,systel.edf.cfg) with parallel/debug sections for GNU/Intel; copy and adapt one for Debian 12.The Python launcher reads the active section from your
systel.*.cfg; ensureUSETELCFGpoints to[debgfopenmpi](or your chosen section).
Ein roher OpenMPI/Gfortran-Abschnitt in der cfg-Datei könnte für eine neu definierte Konfiguration namens debgfopenmpi so aussehen:
# _____                          ___________________________________
# ____/ Debian gfortran OpenMPI /__________________________________/
[debgfopenmpi]

par_cmdexec:   <config>/partel < <partel.par> >> <partel.log>
mpi_cmdexec:   /usr/bin/mpirun -wdir <wdir> -np <ncsize> <exename>

cmd_obj:    /usr/bin/mpifort -cpp -c -O3 -DHAVE_MPI -fconvert=big-endian -frecord-marker=4 <mods> <incs> <f95name>
cmd_lib:    ar cru <libname> <objs>
cmd_exe:    /usr/bin/mpifort -fconvert=big-endian -frecord-marker=4 -lpthread -v -lm -o <exename> <objs> <libs>

mods_all:   -I <config>

incs_all:   -I /usr/include/hdf5/openmpi -I /usr/include
libs_all:   -L /usr/lib/x86_64-linux-gnu/hdf5/openmpi -lhdf5_fortran -lhdf5hl_fortran -lhdf5_hl -lhdf5 \
            -L /usr/lib/x86_64-linux-gnu -lmetis
The Debian 12 OpenMPI + gfortran section still uses OpenMPI’s wrapper compilers and do not hard-code MPI include or library paths into libs_all unless you have an unusual local build. The wrappers inject the right headers and libraries.
Wichtige Schlüssel::
par_cmdexecteilt TELEMAC mit, mit welchem Befehl Sie Ihr Mesh für einen Parallellauf aufteilen sollen.partelist der Splitter; die Umleitung< <partel.par>gibt ihr ihre Parameterdatei und die>> <partel.log>sammelt ihre Ausgabe. Sie behalten diese Zeile bei, um die parallele Ausführung zu ermöglichen; das Entfernen bricht die Aufteilung und ergibt “PARTEL.PAR nicht gefunden” oder ähnliche Fehler. Die offiziellen Linux-Installationshinweise erfordern einen Partitioner für parallele Builds.mpi_cmdexecist der Runtime Launcher. Auf Debian 12 werden sowohl/usr/bin/mpirunals auch/usr/bin/mpiexecvon OpenMPI-Paketen bereitgestellt und sind für unsere Zwecke gleichwertig. Der<wdir>Platzhalter ist das Arbeitsverzeichnis;<ncsize>ist die Anzahl der MPI-Ränge;<exename>ist der produzierte Solver.cmd_obj,cmd_lib,cmd_exedefine the exact compile, archive, and link commands. One can callmpifortrather thangfortran; the wrapper inserts the correct MPI headers and libs for the OpenMPI you have installed. This avoids brittle hardcoding of-I/usr/lib/.../openmpi/includeor-lmpiwith a specific SONAME. Open MPI strongly encourages this practice because the flags vary by build and package.mods_all-Anhänge enthalten Pfade für Moduldateien, die TELEMAC während der Kompilierung generiert; Wenn Sie auf<config>zeigen, werden Schnittstellen zwischen Komponenten angezeigt.incs_allandlibs_allare where you add non-MPI optionals you actually enabled such as AED2, MED, METIS, HDF5. Leave pure MPI out of these; let the wrapper handle MPI.
Wichtige Compiler Flags:
-cppermöglicht die Vorverarbeitung von Fortran-Quellen, so dass#include,#ifund#definefunktionieren. TELEMAC-Quellen verwenden eine bedingte Kompilation; ohne Vorverarbeitung werden diese Direktiven ignoriert und die Kompilation kann fehlschlagen. Jeder moderne Fortran-Compiler mit einem C-ähnlichen Präprozessor akzeptiert dieses Formular.-DNAMEmacros such as-DHAVE_MPIor-DHAVE_AED2define preprocessor symbols that the source checks in#ifdefblocks to compile the correct code paths. You only add-DHAVE_AED2if AED2 is present. The-Dmechanism is standard across compilers.-fconvert=big-endianund-frecord-marker=4steuern unformatierte Dateibyte-Ordnungen und Aufzeichnungsmarkierungen, so dass Binärdateien von verschiedenen Compilern und Plattformen mit den E / A-Erwartungen und Legacy-Dateien von TELEMAC kompatibel bleiben. GNU Fortran dokumentiert diese Optionen; der Standarddatensatz ist 4 Bytes und die Einstellung-fconvertbeeinflusst die Darstellung von unformatierten Datensätzen. Verwenden Sie diese Flags konsistent über Compilation und Run für reproduzierbare unformatierte I / O.-O3ist eine Standard-Hochoptimierung für Release-Builds. Sicher mit Gfortran und der Codebasis von TELEMAC.
Allgemeine Hinweise:
Use
mpifort(ormpif90symlink) and avoid hard-codinglibmpi.soor MPI include paths. Open MPI’s wrapper compilers inject the correct-I/-L/-lautomatically; avoid adding MPI headers/libs toincs_all/libs_all.mpirunundmpiexecsind gültige Launcher auf Debian 12; verwenden Sie, was auch immer Sie bevorzugen.METIS/ParMETIS: Verwenden Sie geteilte libs (
-lmetis,-lparmetis) anstelle der Hardcodierung eines statischen.ain Ihrem Home-Verzeichnis, wobei sich die Header in/usr/includebefinden; libs in/usr/lib/x86_64-linux-gnu.
Gemeinsame Fallstricke:
Entfernen Sie nicht
par_cmdexec, um PARTEL-Fehler zu “beheben”. Überprüfen Sie, ob<partel.par>produziert wird und dass METIS verfügbar ist, wenn Sie Parallelläufe angefordert haben. Die Dokumente von TELEMAC betonen, dass ein Partitioner für die Parallelität erforderlich ist.Pinnen Sie
libs_allnicht an ein Literal.../openmpi/libmpi.sooder an ein SONAME. Wrapper-Compiler existieren genau, um dies zu vermeiden; SONAMEs und Linklinien unterscheiden sich durch den OpenMPI-Build.Fügen Sie optionale Bibliotheken nur hinzu, wenn Sie die Funktion tatsächlich aktiviert haben und wissen, dass die Header und Libs vorhanden sind. Beispiel für AED2, das unter Ihrem Heimatverzeichnis erstellt wurde:
incs_all: [..existing..] -I $HOME/telemac/optionals/aed2/includelibs_all: [..existing..] -L $HOME/telemac/optionals/aed2 -laed2Lassen Sie MPI aus diesen Listen; der Wrapper fügt MPI hinzu.
Wenn Sie Optionen aktivieren, fügen Sie nur diese zu incs_all/libs_all hinzu (verwenden Sie spezielle Links für manuell installierte Pakete):
METIS (für die Trennung von PARTEL-Maschen)
incs_all: [inc_metis]mitinc_metis: -I /usr/includelibs_all: [libs_metis]mitlibs_metis: -L /usr/lib/x86_64-linux-gnu -lmetisAED2 (if you built it under
~/telemac/optionals/aed2/)
Fügen Sie-DHAVE_AED2zucmd_objhinzu und fügen Sie/lib Pfade zu Ihrer AED2-Installation hinzu, zum Beispiel:incs_all: -I <config> -I $HOME/telemac/optionals/aed2/includelibs_all: -L $HOME/telemac/optionals/aed2 -laed2Lassen Sie MPI aus diesen Listen; der Wrapper fügt MPI hinzu.Parallel HDF5 und MED (wenn Sie Serafin/SELAFIN MED I/O in Ihrem Build verwenden) Beispielflaggen:
incs_all: [..existing..] -I /usr/include/hdf5/openmpi -I /usr/includelibs_all: [..existing..] -L /usr/lib/x86_64-linux-gnu/hdf5/openmpi -lhdf5_fortran -lhdf5hl_fortran -lhdf5_hl -lhdf5 -L /usr/lib/x86_64-linux-gnu -lmedC -lmed
Checkliste vor dem Kompilieren:
mpifort -showdruckt einegfortranLinklinie, die bereits MPI libs enthält. Wenn nicht, fehlen OpenMPI-Dev-Pakete.If using parallel HDF5,
h5pfc -showexists and shows.../hdf5/openmpiin its output; otherwise installlibhdf5-openmpi-dev.The chosen
.cfgsection name is the one exported inUSETELCFG. The TELEMAC Python scripts will refuse to build if that section is absent.
Setup Python Quelldatei
Geschätzte Dauer: 4-20 Minuten.
The Python source file also lives in TELEMAC’s /configs folder, where a template called pysource.template.sh is available. Specifically, the pysource file is a shell “env” script that one can source in every terminal before building or running TELEMAC. It sets four anchors the Python launcher uses: HOMETEL, SYSTELCFG, USETELCFG, and SOURCEFILE. TELEMAC’s Python scripts look up SYSTELCFG and selects the section named in USETELCFG. This section guides through either using our pysource.mint22.sh / pysource.debian12.sh (without AED2), or a customized source file.
To facilitate setting up the pysource.mint22.sh file on Linux Mint 22 / Ubuntu 24, our template is designed for use with the above-described systel.mint22.cfg configuration file, and it is based on the default-provided pysource.template.sh. To use it for compiling TELEMAC:
Laden Sie pysource.mint22.sh] aus unserem GitHub-Repository herunter oder kopieren Sie die Dateiinhalte unten in den TELEMAC
/configs-Ordner, hier:/home/HyInfo/opt/telemac-mascaret/configsund speichern Sie alspysource.mint22.sh.Öffnen Sie
pysource.mint22.shin einem Texteditor (z. B. gedit) und überprüfen Sie die Installationspfade. Beachten Sie, dass die Datei die folgende Definition enthält, was sie fast unabhängig von der Definition Ihres Installationspfads macht, solange Salome im gleichen Verzeichnis im Vergleich zu dem Ort liegt, an dem Sie TELEMAC heruntergeladen haben:_THIS_DIR="$(cd "$(dirname "${BASH_SOURCE[0]}")" && pwd)"Überprüfen Sie die Installationspfade von optionalen Geräten, insbesondere HDF5, MED (insbesondere SALOME) und Mumps.
Save
pysource.mint22.shand close the text editor.
Unsere pysource.mint22.sh-Datei sieht so aus:
#!/usr/bin/env bash
# TELEMAC environment for Linux Mint 22 (Ubuntu 24.04 base) with MPI/HDF5/METIS/MED/MUMPS/ScaLAPACK

# Resolve this script's directory and HOMETEL from it so it works no matter where you cloned TELEMAC
# Expected layout: ~/opt/telemac/{configs, scripts, sources, ...}
_THIS_DIR="$(cd "$(dirname "${BASH_SOURCE[0]}")" && pwd)"
export HOMETEL="$(cd "${_THIS_DIR}/.." && pwd)"
export SOURCEFILE="${_THIS_DIR}"

# Configuration file and config name used by telemac.py
# Adjust USETELCFG to match a section present in your systel.mint22.cfg
export SYSTELCFG="${HOMETEL}/configs/systel.mint22.cfg"
export USETELCFG="hyinfompiubu"

# Make TELEMAC Python utilities available
# (Both python3 helpers and legacy unix scripts are often useful)
if [ -d "${HOMETEL}/scripts/python3" ]; then
  export PATH="${HOMETEL}/scripts/python3:${PATH}"
fi
if [ -d "${HOMETEL}/scripts/unix" ]; then
  export PATH="${HOMETEL}/scripts/unix:${PATH}"
fi

# Compilers and MPI (OpenMPI from APT)
export MPI_ROOT="/usr"
export CC="mpicc"
export FC="mpifort"
export MPIRUN="mpirun"

# Library/include roots from Ubuntu 24.04 packages
# OpenMPI libraries
_OMPI_LIB="/usr/lib/x86_64-linux-gnu/openmpi/lib"
_OMPI_INC="/usr/lib/x86_64-linux-gnu/openmpi/include"

# HDF5 (serial headers via libhdf5-dev; libs in the multiarch lib dir)
# If you later install parallel HDF5 (libhdf5-openmpi-dev), set _HDF5_INC="$_OMPI_INC"
_HDF5_INC="/usr/include/hdf5/openmpi/"
_HDF5_LIB="/usr/lib/x86_64-linux-gnu/hdf5/openmpi"

# MED (optional - not actively used in the corrent setup)
_MED_INC="/usr/include/med"
_MED_LIB="/usr/lib/x86_64-linux-gnu"

# METIS
_METIS_INC="/usr/include"
_METIS_LIB="/usr/lib/x86_64-linux-gnu"

# MUMPS (both seq and mpi dev packages provide headers+libs under multiarch dir)
_MUMPS_INC="/usr/include"
_MUMPS_LIB="/usr/lib/x86_64-linux-gnu"

# ScaLAPACK (OpenMPI build)
_SCALAPACK_LIB="/usr/lib/x86_64-linux-gnu"

# Expose common hints some TELEMAC configs look for (non-fatal if unused)
export MPI_INCLUDE="${_OMPI_INC}"
export MPI_LIBDIR="${_OMPI_LIB}"

export HDF5_ROOT="/usr"
export HDF5_INCLUDE_PATH="${_HDF5_INC}"
export HDF5_LIBDIR="${_HDF5_LIB}"

export MED_ROOT="$HOME/opt/salome/BINARIES-UB24.04/medfile/"
export MED_INCLUDE_PATH="$HOME/opt/salome/BINARIES-UB24.04/medfile/include"
export MED_LIBDIR="$HOME/opt/salome/BINARIES-UB24.04/medfile/lib"

export METIS_ROOT="/usr"
export METIS_INCLUDE_PATH="${_METIS_INC}"
export METIS_LIBDIR="${_METIS_LIB}"

export MUMPS_ROOT="/usr"
export MUMPS_INCLUDE_PATH="${_MUMPS_INC}"
export MUMPS_LIBDIR="${_MUMPS_LIB}"

export SCALAPACK_LIBDIR="${_SCALAPACK_LIB}"

# Build and wrapped API locations (created after you compile)
# Keep these early in the path so Python can import the TELEMAC modules and extensions
if [ -d "${HOMETEL}/builds/${USETELCFG}/wrap_api/lib" ]; then
  export PYTHONPATH="${HOMETEL}/builds/${USETELCFG}/wrap_api/lib:${PYTHONPATH}"
fi

# TELEMAC Python helpers
if [ -d "${HOMETEL}/scripts/python3" ]; then
  export PYTHONPATH="${HOMETEL}/scripts/python3:${PYTHONPATH}"
fi

# Runtime search paths
# Put OpenMPI first to avoid picking up non-MPI BLAS/LAPACK accidentally
# The standard multiarch directory is added as a safety net
for _libdir in \
  "${_OMPI_LIB}" \
  "${_MED_LIB}" \
  "${_METIS_LIB}" \
  "${_MUMPS_LIB}" \
  "${_SCALAPACK_LIB}" \
  "/usr/lib/x86_64-linux-gnu"
do
  case ":${LD_LIBRARY_PATH}:" in
    *:"${_libdir}":*) ;;
    *) export LD_LIBRARY_PATH="${_libdir}:${LD_LIBRARY_PATH}";;
  esac
done

# Add include directories to CPATH so builds find headers without extra flags
for _incdir in \
  "${_OMPI_INC}" \
  "${_HDF5_INC}" \
  "${_MED_INC}" \
  "${_METIS_INC}" \
  "${_MUMPS_INC}"
do
  case ":${CPATH}:" in
    *:"${_incdir}":*) ;;
    *) export CPATH="${_incdir}:${CPATH}";;
  esac
done

# Convenience: print a one-line summary so you know which config is active
echo "TELEMAC set: HOMETEL='${HOMETEL}', SYSTELCFG='${SYSTELCFG}', USETELCFG='${USETELCFG}'"

# Make Python unbuffered for clearer build logs
export PYTHONUNBUFFERED="1"
To facilitate setting up the pysource.debian12.sh file on Debian 12, our template is designed for use with the above-described systel.debian12.cfg configuration file, and it is based on the default-provided pysource.template.sh. To use it for compiling TELEMAC:
Laden Sie pysource
.debian12 .sh] aus unserem GitHub-Repository herunter oder kopieren Sie die Dateiinhalte unten in den TELEMAC /configs-Ordner, hier:/home/HyInfo/opt/telemac-mascaret/configsund speichern Sie alspysource.debian12.sh.Öffnen Sie
pysource.debian12.shin einem Texteditor (z. B. gedit) und überprüfen Sie die Installationspfade. Beachten Sie, dass die Datei die folgende Definition enthält, was sie fast unabhängig von der Definition Ihres Installationspfads macht, solange Salome im gleichen Verzeichnis im Vergleich zu dem Ort liegt, an dem Sie TELEMAC heruntergeladen haben:_THIS_DIR="$(cd "$(dirname "${BASH_SOURCE[0]}")" && pwd)"Überprüfen Sie die Installationspfade von optionalen Geräten, insbesondere HDF5, MED (insbesondere SALOME) und Mumps.
Save
pysource.debian12.shand close the text editor.
Unsere pysource.debian12.sh-Datei sieht so aus:
#!/usr/bin/env bash
# TELEMAC environment for Debian 12 with MPI/HDF5/MED/METIS/MUMPS/ScaLAPACK
# Assumes all optional dependencies are installed from from apt on Debian 12
# Only SALOME is user-installed

# Resolve script directory and HOMETEL from it
_THIS_DIR="$(cd "$(dirname "${BASH_SOURCE[0]}")" && pwd)"
export HOMETEL="$(cd "${_THIS_DIR}/.." && pwd)"
export SOURCEFILE="${_THIS_DIR}"

# Configuration file and config name used by telemac.py
# Adjust USETELCFG to match a section present in configs/systel.debian12.cfg
export SYSTELCFG="${HOMETEL}/configs/systel.debian12.cfg"
export USETELCFG="hyinfompideb12"

# Make TELEMAC Python utilities available
if [ -d "${HOMETEL}/scripts/python3" ]; then
    case ":${PATH}:" in *:"${HOMETEL}/scripts/python3":*) ;; *) export PATH="${HOMETEL}/scripts/python3:${PATH}";; esac
fi
if [ -d "${HOMETEL}/scripts/unix" ]; then
  case ":${PATH}:" in *:"${HOMETEL}/scripts/unix":*) ;; *) export PATH="${HOMETEL}/scripts/unix:${PATH}";; esac
fi

# Detect Debian multiarch lib directory and common include roots
_arch="$(gcc -dumpmachine 2>/dev/null || echo x86_64-linux-gnu)"
_archlib="/usr/lib/${_arch}"

# Helper to pick the first existing directory
_first_dir() {
  for _d in "$@"; do
    [ -d "$_d" ] && { printf '%s' "$_d"; return 0; }
  done
  return 1
}

# MPI. Prefer OpenMPI wrappers if present
_MPI_BIN="$(dirname "$(command -v mpif90 2>/dev/null || command -v mpifort 2>/dev/null || command -v mpicc 2>/dev/null || echo /usr/bin/mpif90)")"
_MPI_INC="$(_first_dir \
  "${_archlib}/openmpi/include" \
  "/usr/include/openmpi" \
  "/usr/include/mpi" \
  "${_archlib}/mpi/include")"
_MPI_LIB="$(_first_dir \
  "${_archlib}/openmpi/lib" \
  "${_archlib}" \
  "/usr/lib")"

# HDF5 parallel. Debian installs OpenMPI-flavored headers in /usr/include/hdf5/openmpi
_HDF5_INC="$(_first_dir \
  "/usr/include/hdf5/openmpi" \
  "/usr/include/hdf5/serial")"
_HDF5_LIB="$(_first_dir \
  "${_archlib}/hdf5/openmpi" \
  "${_archlib}/hdf5/serial" \
  "${_archlib}")"

# MED-fichier
export _MED_ROOT="$HOME/opt/salome/BINARIES-DB12/medfile/"
export _MED_INC="$HOME/opt/salome/BINARIES-DB12/medfile/include"
export _MED_LIB="$HOME/opt/salome/BINARIES-DB12/medfile/lib"

# METIS and ParMETIS
_METIS_INC="$(_first_dir "/usr/include")"
_METIS_LIB="$(_first_dir "${_archlib}")"
_PARMETIS_INC="$(_first_dir "/usr/include")"
_PARMETIS_LIB="$(_first_dir "${_archlib}")"

# MUMPS and ScaLAPACK
_MUMPS_INC="$(_first_dir "/usr/include/mumps" "/usr/include")"
_MUMPS_LIB="$(_first_dir "${_archlib}")"
_SCALAPACK_LIB="$(_first_dir "${_archlib}")"

# Add useful binaries to PATH
for _bindir in \
  "${_MPI_BIN}" \
  "/usr/bin"
do
  case ":${PATH}:" in *:"${_bindir}":*) ;; *) export PATH="${_bindir}:${PATH}";; esac
done

# Library search path
for _libdir in \
  "${_MPI_LIB}" \
  "${_HDF5_LIB}" \
  "${_SCALAPACK_LIB}" \
  "${_MUMPS_LIB}" \
  "${_METIS_LIB}" \
  "${_PARMETIS_LIB}" \
  "${_MED_LIB}"
do
  [ -n "${_libdir}" ] || continue
  case ":${LD_LIBRARY_PATH}:" in *:"${_libdir}":*) ;; *) export LD_LIBRARY_PATH="${_libdir}:${LD_LIBRARY_PATH}";; esac
done

# Include search path for some build helpers that honor CPATH
for _incdir in \
  "${_MPI_INC}" \
  "${_HDF5_INC}" \
  "${_MED_INC}" \
  "${_METIS_INC}" \
  "${_PARMETIS_INC}" \
  "${_MUMPS_INC}"
do
  [ -n "${_incdir}" ] || continue
  case ":${CPATH}:" in *:"${_incdir}":*) ;; *) export CPATH="${_incdir}:${CPATH}";; esac
done

# Convenience: print a one-line summary
echo "TELEMAC set: HOMETEL='${HOMETEL}', SYSTELCFG='${SYSTELCFG}', USETELCFG='${USETELCFG}'"
echo "MPI bin='${_MPI_BIN}', MPI inc='${_MPI_INC}', MPI lib='${_MPI_LIB}'"
echo "HDF5 inc='${_HDF5_INC}', HDF5 lib='${_HDF5_LIB}'"
echo "MED inc='${_MED_INC}', MED lib='${_MED_LIB}'"

# Unbuffered Python for clearer build logs
export PYTHONUNBUFFERED="1"
As a general note, one should expose TELEMAC’s Python utilities on PATH and PYTHONPATH so telemac2d.py etc. are found. Prefer OpenMPI wrapper compilers (mpifort, mpicc) instead of hardcoding MPI headers and libraries. OpenMPI explicitly recommends this; the wrappers inject the right -I/-L/-l for your installation. For optional features like TelApy, TELEMAC builds a small “wrap_api” tree in the build directory; adding that to PYTHONPATH and LD_LIBRARY_PATH is the correct way to make the Python API importable. Use the following as a starting point; replace USERNAME and adjust SYSTELCFG and USETELCFG:
#!/usr/bin/env bash
# TELEMAC environment for Debian 12 + OpenMPI

# 1) Core paths
export HOMETEL="/home/USERNAME/telemac-mascaret"
export SYSTELCFG="${HOMETEL}/configs/systel.cis-debian.cfg"
export USETELCFG="debgfopenmpi"
export SOURCEFILE="${HOMETEL}/configs/pysource.gfortranHPC.sh"

# 2) Make TELEMAC tools available
case ":$PATH:" in *:"${HOMETEL}/scripts/python3":*) ;; *) export PATH="${HOMETEL}/scripts/python3:${PATH}";; esac
case ":$PATH:" in *:"${HOMETEL}/scripts/unix":*)   ;; *) export PATH="${HOMETEL}/scripts/unix:${PATH}";; esac
case ":$PYTHONPATH:" in *:"${HOMETEL}/scripts/python3":*) ;; *) export PYTHONPATH="${HOMETEL}/scripts/python3:${PYTHONPATH}";; esac

# 3) Unbuffered Python for clearer build logs
export PYTHONUNBUFFERED="1"

# 4) TelApy (Python API) - populated after a build; harmless if absent
_wrap_api_lib="${HOMETEL}/builds/${USETELCFG}/wrap_api/lib"
[ -d "$_wrap_api_lib" ] && export LD_LIBRARY_PATH="${_wrap_api_lib}:${LD_LIBRARY_PATH}"
[ -d "$_wrap_api_lib" ] && export PYTHONPATH="${_wrap_api_lib}:${PYTHONPATH}"

# 5) MPI - use OpenMPI wrappers; do NOT point to MPICH
# on Debian 12, mpifort/mpirun live in /usr/bin via openmpi-bin/libopenmpi-dev
command -v mpifort >/dev/null 2>&1 || echo "Warning: mpifort not found; install openmpi-bin libopenmpi-dev"
command -v mpirun  >/dev/null 2>&1 || echo "Warning: mpirun not found; install openmpi-bin"

# 6) Optional libs installed from Debian packages need no path tweaks - otherwise,
# if you compiled optionals under $HOMETEL/optionals (e.g., AED2), add them explicitly:
# export LD_LIBRARY_PATH="${HOMETEL}/optionals/aed2:${LD_LIBRARY_PATH}"
# export PYTHONPATH="${HOMETEL}/optionals/aed2:${PYTHONPATH}"

echo "TELEMAC env set: HOMETEL=${HOMETEL}, USETELCFG=${USETELCFG}"
Hinweis:
SYSTELCFGzeigt auf Ihre.cfg-Datei;USETELCFGmuss mit dem Abschnittskopf übereinstimmen, den Sie verwenden möchten, zum Beispiel[debgfopenmpi]. So entdeckt der Python Launcher von TELEMAC das “Build-Rezept”.PATHbeinhaltet sowohlscripts/python3als auchscripts/unix, sodass Sietelemac.py,compile.py,runcode.pyund Shell-Helfer direkt ausführen können.mpifortundmpirunsind die richtigen OpenMPI-Einstiegspunkte für Debian 12.mpif90existiert, ist aber ein Legacy-Alias; OpenMPI empfiehltmpifort.mpirunundmpiexecsind Synonyme und werden in/usr/binausgeliefert.Nein
MPIHOMEund keinLD_LIBRARY_PATHHacking für OpenMPI. Wrapper-Compiler entfernen die Notwendigkeit, OpenMPI include/lib Pfade zu exportieren; der Export vonLD_LIBRARY_PATHauf OpenMPI-Bibliotheken ist sowohl unnötig als auch zerbrechlich auf Debianwrap_api/libon bothPYTHONPATHandLD_LIBRARY_PATHis the correct way to make TelApy importable after you build it. This matches where TELEMAC emits the API artifacts.Setzen Sie nicht
MPIHOME=/usr/bin/mpifort.mpich, wenn Sie mit OpenMPI bauen. Dieser Wert weist auf eine MPICH-Binärdatei hin und führt zu nicht übereinstimmenden Headern und Bibliotheken zur Kompilierungs- oder Laufzeit. Verwenden Sie OpenMPI konsequent oder wechseln Sie den gesamten Stack auf MPICH. OpenMPIs eigene Dokumente betonen die Konsistenz des Wrappers.Fügen Sie nicht
LD_LIBRARY_PATH=$PATH/libhinzu oder verweisen Sie auflib/x86_64-linux-gnu/openmpi.$PATHist kein Bibliotheksverzeichnis, und das Hardcoding der OpenMPI-Bibliothek in der env-Datei ist unnötig, wenn Sie kompilieren und mitmpifortverlinken.Do not hard-code
libmpi.soanywhere inpysourceor in your.cfgif you are already using wrapper compilers. Letmpifortdrive the link line.
If you use distro packages, you typically do not need to set any paths in pysource:
OpenMPI-Tools:
/usr/bin/mpifort,/usr/bin/mpicc,/usr/bin/mpirunoder/usr/bin/mpiexec.Parallel HDF5 (if enabled in your cfg): headers under
/usr/include/hdf5/openmpi, libs under/usr/lib/x86_64-linux-gnu/hdf5/openmpivialibhdf5-openmpi-dev.METIS from Debian: link as
-lmetisfromlibmetis-dev; headers in/usr/include, libs in/usr/lib/x86_64-linux-gnu. Prefer this over a hand-builtlibmetis.aunder~/telemac/optionals.
Compilation
Geschätzte Dauer: 20-30 Minuten (das Kompilieren braucht Zeit).
The compiler is invoked by TELEMAC’s Python tools using the shell environment set by your pysource script (pysource.mint22.sh or pysource.debian12.sh). That script tells TELEMAC where helper programs and libraries live and which configuration to use. With it in place, compiling becomes straightforward from Terminal. First, source the appropriate pysource file and then verify the setup by running config.py:
cd /home/HyInfo/opt/telemac-mascaret/configs    # adjust this path to your install
source pysource.mint22.sh                       # or: source pysource.debian12.sh
config.py
Sourcing the our pysource.mint22.sh or pysource.debian12.sh scripts should echo the TELEMAC paths and the configuration name. Running config.py should display the ASCII banner and finish with My work is done. If not, read the error output carefully; typical causes are typos in paths or filenames, or mistakes inside pysource.x.sh or your systel.*.cfg.
After config.py completes successfully, compile TELEMAC. Use the --clean flag to remove any artifacts from prior builds and avoid conflicts:
compile_telemac.py --cleanDer Build läuft eine Weile und sollte mit der Nachricht My work is done enden. Wenn es mit Fehlern aufhört, scrollen Sie zum ersten Fehler und beheben Sie das gemeldete Problem, bevor Sie den Befehl erneut ausführen.
Test TELEMAC
Geschätzte Dauer: 5-10 Minuten.
Nach dem Schließen des Terminals oder bei einem Neustart des Systems müssen Sie die TELEMAC-Umgebung erneut laden, bevor Sie sie ausführen:
cd ~/opt/telemac-mascaret/configs    # adjust if you installed elsewhere
source pysource.mint22.sh            # or: source pysource.debian12.sh
Run a predefined case from the examples folder:
cd ~/opt/telemac-mascaret/examples/telemac2d/gouttedo
telemac2d.py t2d_gouttedo.cas
Examples not working?
Do not panic. If config.py succeeded and the build ended with “My work is done”, your installation is usually fine. Most example failures come from environment issues or missing large files. Ensure you have sourced the correct pysource.*.sh, installed all Git requirements including Git LFS, checked out the right version, and pulled the full repository. If needed, re-clone with Git LFS enabled and recompile TELEMAC, starting from the git section.
Um die Parallelität zu überprüfen, installieren Sie htop, um die CPU-Auslastung zu visualisieren:
sudo apt update
sudo apt install htop
Starten Sie den CPU-Monitor:
htopFühren Sie in einem neuen Terminal-Tab ein TELEMAC-Beispiel mit dem --ncsize=N-Flag aus, wobei N die Anzahl der zu verwendenden logischen CPUs ist (stellen Sie sicher, dass mindestens N verfügbar sind):
cd ~/opt/telemac-mascaret/examples/telemac2d/gouttedo
telemac2d.py t2d_gouttedo.cas --ncsize=4
Alternatively, use --nctile and --ncnode to specify cores per node (NCTILE) and number of nodes (NCNODE), respectively, with NCSIZE = NCTILE * NCNODE. The following two commands are equivalent (from ~/opt/telemac-mascaret/examples/telemac2d/donau):
telemac2d.py t2d_donau.cas --nctile=4 --ncnode=2
telemac2d.py t2d_donau.cas --ncsize=8
Cannot find <<PARTEL.PAR>>?
If you see Cannot find << PARTEL.PAR >> or TypeError: can only concatenate str (not ...) to str, ensure par_cmdexec is removed from your configuration file.
Während die Berechnung läuft, beobachten Sie die gesamte CPU-Auslastung. Wenn mehrere Kerne eine anhaltende Aktivität in unterschiedlichen Prozentsätzen zeigen, funktioniert der Parallellauf.
TELEMAC should start, run the example, and finish with My work is done. To gauge efficiency, vary --ncsize. For instance, on a contemporary laptop the donau case often runs in approx. 1 minute with --ncsize=4 and approx. 2-3 minutes with --ncsize=2; exact timings depend on hardware, mesh size, and I/O. Scaling is not linear due to domain-partition overhead, memory bandwidth limits, and hyperthreading, so launching several smaller jobs on fewer cores can be more efficient than one job on many cores.
Troubleshoot ‘No such file or directory’
Wenn Sie die Terminalsitzung unterbrochen haben und No such file or directory sehen, laden Sie die TELEMAC-Umgebung erneut, bevor Sie Beispiele wiederholen:
cd ~/opt/telemac-mascaret/configs
source pysource.mint22.sh      # or: source pysource.debian12.sh
config.py
Then return to the examples folder and run the case again.
Erstellung der TELEMAC-Dokumentation
TELEMAC includes many application examples under /telemac-mascaret/examples/, and you can build the user and reference manuals locally. First, load the TELEMAC environment:
source ~/opt/telemac-mascaret/configs/pysource.mint22.shTo generate the user manual (this can take a while and requires latex, that is, texlive on Debian/Ubuntu):
doc_telemac.pyZur Erstellung des Referenzhandbuchs:
doc_telemac.py --referenceErstellen von Dokumentations- und Validierungsberichten für alle Beispielfälle:
validate_telemac.pyUtilities (Vor- und Nachbearbeitung)
QGIS und das Q4TS Plugin (Linux und Windows)
Geschätzte Dauer: 5-10 Minuten (abhängig von der Verbindungsgeschwindigkeit).
QGIS is a powerful tool for viewing, creating, and editing geospatial data and is useful for both pre- and post-processing. Installation guidance appears in the QGIS instructions and the QGIS tutorial in this eBook. The Q4TS plugin supports preparing and post-processing files for TELEMAC and can be linked with SALOME to launch TELEMAC from a GUI.
To install Q4TS, follow the developers’ instructions at https://
Öffnen Sie in QGIS den Plugin Manager (Plugins > Plugins verwalten und installieren...).
Gehen Sie zu Einstellungen > Hinzufügen..., setzen Sie die URL auf
https://otm.gitlab-pages.pam-retd.fr/q4ts/plugins.xml, wählen Sie einen Name (z. B.q4ts) und lassen Sie die anderen Felder unverändert. Klicken Sie auf OK.Klicken Sie auf Reload all Repositories.
In the All tab, search for
Q4TSand install the plugin.
Plugin not found?
Q4TS requires QGIS 3.26 or newer. If your QGIS is older, the Plugin Manager will not list it. The reliable fix is to upgrade QGIS. As a temporary workaround, you can download the ZIP from https://
After installation, Q4TS adds tools in the QGIS Processing Toolbox for MED -- SLF conversion, mesh refinement, boundary creation, friction table editing, and more. Basic utility for post-processing is described in the steady-flow simulation tutorial <tm-use-q4ts> with Telemac2d.
To get started with the Q4TS plugin, see Fig. 1 (Windows: Fig. 2) and consult the developers’ user manual on GitLab: https://
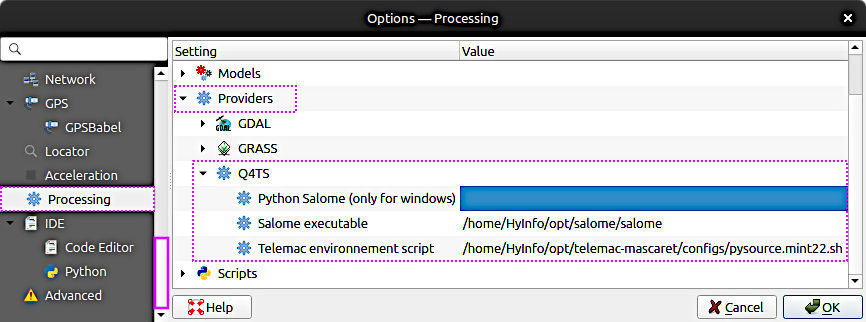
Figure 1:Die Konfiguration des Q4TS unter Ubuntu Linux. Um diese Pfade in QGIS festzulegen, gehen Sie zu Einstellungen (oberes Menü) > Optionen... > Verarbeitung > Anbieter > Q4TS.
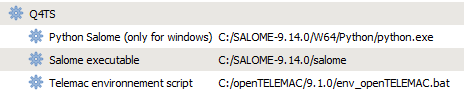
Figure 2:Die Konfiguration des Q4TS unter Windows (Bildquelle: gitlab
Other (stale) plugins
Ältere, teilweise nicht funktionierende TELEMAC-bezogene Plugins für QGIS sind:
Telemac Tools, ein experimenteller Mesh-Generator für
*.slfDateien, entwickelt von Artelia.] Aktivieren Sie in QGIS experimentelle Plugins im Plugin Manager Einstellungen vor der Suche.BASEmesh, das ein SMS 2dm-Mesh erstellen kann, das Sie in eine SELAFIN-Geometrie für TELEMAC konvertieren können (siehe QGIS pre-processing tutorial for TELEMAC).
PostTelemac, das
*.slfund verwandte Ergebnisformate (z. B.*.res) im Laufe der Zeit visualisiert.DEMto3D, das STL-Geometrie exportiert, die für den Einsatz in SALOME und für die Erstellung von 3D-Netzen geeignet ist.
Beachten Sie, dass DEMto3D im Menü Raster erscheint: DEMto3D > Digitales Oberflächenmodell (DOM) 3D-Druck. Diese Plugins können veraltet oder inkompatibel mit aktuellen QGIS-Releases sein; bevorzugen Sie Q4TS für aktiv gepflegte TELEMAC-Workflows, wenn möglich.
Mesh-Werkzeuge von Artlia
Artelia provides a Python-based analysis toolkit on GitHub: https://
Nachdem Sie das Plugin über den QGIS Plugin Manager installiert haben, greifen Sie über Mesh > Mesh Tools darauf zu.
BlueKenue (Windows oder Linux+wine)
Geschätzte Dauer: 10 Minuten.
BlueKenueTM is a Windows-based pre- and post-processing tool from the National Research Council Canada, which is designed for TELEMAC. It offers functionality similar to Fudaa and includes a capable mesh generator, which is the main reason to install BlueKenueTM. Download the installer from the developer site: https://
On Windows: run the BlueKenue
.msiinstaller directly.Unter Linux: Verwenden Sie Wine amd64 bis PlayOnLinux, um BlueKenueTM zu installieren. Für Ubuntu/Debian-Systeme siehe den Abschnitt PlayOnLinux in diesem eBook. Die Installation nur mit reinem Wein wird aufgrund allgemeiner Kompatibilitätsprobleme entmutigt.
Typische BlueKenueTM Ausführbare Standorte sind:
32-Bit:
"C:\\Program Files (x86)\\CHC\\BlueKenue\\BlueKenue.exe"64-Bit:
"C:\\Program Files\\CHC\\BlueKenue\\BlueKenue.exe"
Weitere plattformübergreifende Anleitungen finden Sie im CHyMS FAQ, insbesondere im Abschnitt zum Ausführen von Blue Kenue auf anderen Betriebssystemen].
Fudaa-PrePro (Linux und Windows)
Geschätzte Dauer: 5-15 Minuten (oberes Zeitlimit, wenn Java installiert werden muss).
Fudaa-PrePro ist ein Java-basiertes grafisches Frontend für das TELEMAC-System, das Ihnen hilft, Modelle einzurichten, indem Sie Meshes, Rand- und Anfangsbedingungen definieren und (.cas) Dateien steuern, und es kann auch Simulationen starten und bei der grundlegenden Nachbearbeitung helfen. Es wird vom Fudaa-Projekt gepflegt und mit Dokumentation und Downloads auf seiner Website verteilt und von den TELEMAC-Entwicklern als benutzerfreundlicher Vorprozessor für die Konfiguration von Berechnungen bezeichnet. Machen Sie sich bereit mit der Vor- und Nachbearbeitungssoftware Fudaa-PrePro:
Java installieren:
Unter Linux:
sudo apt install default-jdk(das JRE funktioniert allein für das Laufen; das JDK ist sowohl für das Laufen als auch für Werkzeuge sicher)Unter Windows erhalten Sie Java von java.com]
Laden Sie die neueste Version aus dem Fudaa-PrePro repository] herunter.
Entpacken Sie die heruntergeladene Datei und fahren Sie abhängig von Ihrer Plattform fort (siehe unten).
cdin das Verzeichnis, in dem Sie die Fudaa-PrePro-Programmdateien freigegeben haben.Starten Sie Fudaa-PrePro vom Terminal oder der Eingabeaufforderung:
Auf Linux: run
sh supervisor.shAuf Windows: run
supervisor.bat
Wenn Sie einen Fehler sehen wie:
Error: Could not find or load main class org.fudaa.fudaa.tr.TrSupervisoredit supervisor.sh and replace $PWD Fudaa with $(pwd)/Fudaa so the classpath resolves correctly. You can also adjust the default RAM setting in supervisor.sh (or supervisor.bat). Fudaa-PrePro often ships with -Xmx6144m (≈6 GB); increase it for very large meshes (millions of nodes) or decrease it on low-RAM systems. Set -Xmx to a sensible multiple of 512 MB. For example, to use 2 GB and fix the classpath:
#!/bin/bash
cd "$(dirname "$0")"
java -Xmx2048m -Xms512m -cp "$(pwd)/Fudaa-Prepro-1.4.2-SNAPSHOT.jar" org.fudaa.fudaa.tr.TrSupervisor "$@"