Make code user-friendly. For interactive reading and executing code blocks  , or install Python and JupyterLab locally.
Run this notebook with marimo
Dieses Notizbuch ist auch als marimoNotebook (ein reaktives Python-Notizbuch, das als reine .py-Datei gespeichert ist) im marimo
Repository:
git clone https://github.com/sschwindt/marimo-python-course.gitDie Kursumgebung erstellen und aktivieren:
conda env create -f environment.ymlundconda activate hy-marimoStarten Sie im Ordner Repository das Notebook mit
marimo edit b11-gui.py
Eine Graphical User Interface (GUI) ermöglicht die Einstellung von Eingabevariablen von Skripten. Dies ist besonders nützlich für die Wiederverwendung eines Skripts, das Sie vor langer Zeit geschrieben haben, ohne das gesamte Skript noch einmal im Detail studieren zu müssen. Obwohl es fraglich ist, ob GUIs in Zeiten von Webanwendungen noch angemessen sind, müssen große und insbesondere urheberrechtlich geschützte Daten lokal verarbeitet werden. Letztendlich kann eine GUI für die lokale Datenverarbeitung sehr bequem sein, um selbst geschriebene, benutzerdefinierte Programme auszuführen.
Watch this section as a video
Watch this section as a video on the @Hydro-Morphodynamics channel on YouTube.
Mehrere GUI-Bibliotheken (Pakete) sind für Python verfügbar und dieses Kapitel baut auf der tkinter] Bibliothek auf. Alternativen sind zum Beispiel wxPython oder Jython (eine Java Implementierung von Python2). tkinter ist eine Standardbibliothek, die nicht zusätzlich installiert werden muss. Geben Sie zum Beispiel das Terminal ein (z. B. Anaconda Prompt, PyCharm oder Linux Terminal - nicht in Python selbst):
python -m tkinterLinux users
If you encounter troubles with tkinter on Linux, make sure that tkinter for Python is installed, either with sudo apt install python3-tk or sudo apt install python3.X-tk (replace X with your Python version) or
sudo apt install tk8.6-dev to install the library only (this should be sufficient).
If the above comments do not work, make sure that the tkinter repository is available to your system, for example on Debian: sudo add-apt-repository ppa:deadsnakes/ppa (the repository address may change and depends on your Linux and Python versions).
tkinter funktioniert auf den beliebtesten Plattformen (Linux, macOS, Windows) und ist nicht nur für Python verfügbar, sondern auch für Ruby, Perl, Tcl (der Ursprung von tkinter) und viele weitere Sprachen. Da es Sprachen wie Ruby oder Perl unterstützt, kann tkinter sowohl für lokale GUIs als auch für Webanwendungen verwendet werden.
Die erste GUI
The very first step is to import tkinter, usually using the alias as tk. With tk.Tk(), a so-called parent window (e.g., top) can be created, in which further elements will be accommodated. All further elements are created as tk child-objects of the parent window and placed (arranged) in the parent window using the pack() or grid() method. Here, we will use pack most of the time and grid will be useful to place elements at an exact position on the window (e.g., tk.ELEMENT.grid(row=INT, column=INT)). To display the GUI, the parent window top must be launched with top.mainloop() after arranging all elements. The following code block shows how to create a parent window with a label element (tk.Label).
import tkinter as tk
top = tk.Tk()
a_label = tk.Label(top, text = "A label just shows some text.")
a_label.pack()
top.mainloop()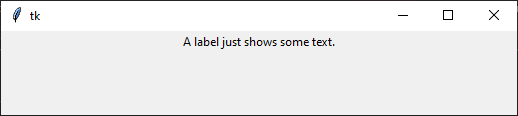
Figure 1:Die resultierende GUI.
After calling the mainloop() method the window is in a wait state. That means the window is waiting for events being triggered through user action (e.g., a click on a button). This is called event-driven programming, where event handlers are called rather than a single linear flow in the form of a sequence of (Python) commands.
For now, our window uses default values, for instance, for the window title, size, and background color. These window properties can be modified with the title, minsize or maxsize, and configure attributes of the top parent window:
top = tk.Tk()
a_label = tk.Label(top, text="A label just shows some text.")
a_label.pack()

top.title("My first GUI App")
top.minsize(628, 382)
top.configure(bg="sky blue")
top.mainloop()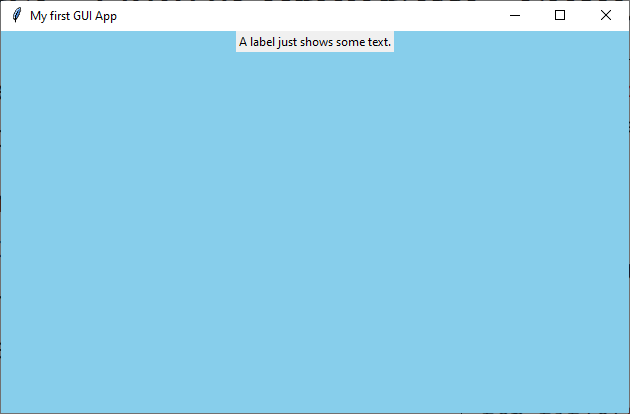
Figure 2:Die konfigurierte GUI.
Hinzufügen einer Schaltfläche, um eine Funktion zu rufen
Currently, the window only shows a (boring) label and waits for events that do not exist. With a tk.Button we can add an event trigger, which still needs something to trigger. To this end, define a call_back function that creates an infobox, which is an object of showinfo from tkinter.messagebox (i.e., it needs to be imported).
from tkinter.messagebox import showinfo
# more message boxes: askokcancel, askyesno

def call_back(message):
    showinfo("This is an Infobox", message)


top = tk.Tk()
a_label = tk.Label(top, text="Here is the button.")
a_label.pack()
# add a button
a_button = tk.Button(top, text = ">> Click <<", command=lambda: call_back("Greetings from the Button."))
a_button.pack()
top.mainloop()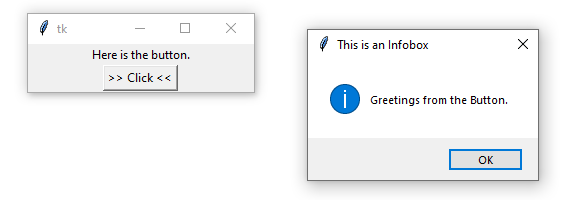
Figure 3:Die GUI mit einem Button, der eine Infobox aufruft.
Ein Vanille tkinter Programm
The above code blocks instantiate tkinter objects (widgets) in non-object-oriented script style. However, when we write a GUI, we most likely want to start an application (App) by running the script. This is why tkinter widgets are usually created as objects of custom classes that typically inherit from tk.Frame. Therefore, the following code block recasts the previous example into an object-oriented code with the template from the section on Python classes.
The below example creates a VanillaApp, which is a child of tk.Frame (tkinters master frame). The initialization method __init__ needs to invoke tk.Frame and pack() it to initialize the window. After that, we can place other widgets such as labels and buttons as before. In the VanillaApp, we can also directly implement the above call_back function as a method. In addition, make the script run stand-alone (not supported by a beautiful Jupyter notebook) by adding an if __name__ == "__main__": VanillaApp().mainloop() statement at the bottom of the script (read more about the __main__ statement in the section on packages).
# define the VanillaApp class
class VanillaApp(tk.Frame):
    def __init__(self, master=None):
        tk.Frame.__init__(self, master)
        self.pack()

        table_label = tk.Label(master, text="Do you want vanilla ice?")
        table_label.pack()
        vanilla_button = tk.Button(master, text = "I want Vanilla", command=lambda: call_back("Here is Vanilla!"))
        vanilla_button.pack()
        no_vanilla_button = tk.Button(master, text = "I want something else", command=lambda: call_back("Here is bread!"))
        no_vanilla_button.pack()

    def call_back(self, message):
        showinfo("This is an Infobox", message)


# instantiate a VanillaApp object
if __name__ == "__main__":
    VanillaApp().mainloop()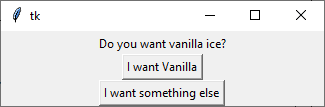
Figure 4:Die VanillaApp GUI mit zwei Buttons und einem Label.
Machen Sie Skript eine eigenständige App
Der obige Codeblock, der die VanillaApp-Klasse bereitstellt, kann in jede externe Python-Datei kopiert und gespeichert werden, z. B. vanilla_app.py. Als nächstes starten Sie in Anaconda Prompt (Windows) oder Linux Terminal die GUI wie folgt (abhängig von dem verwendeten Python installation):
Aktivieren Sie die erforderliche Umgebung, zum Beispiel:
Windows/Anaconda:
conda activate flussenvLinux/Virtualenv:
source vflussenv/bin/activate
Navigieren Sie zum Verzeichnis, in dem sich das Skript befindet (verwenden Sie
cdin Windows oder Linux/macOS].)Geben Sie
python vanilla_app.py(oderpython -m vanilla_app.py) ein, um die GUI zu starten.
Diese Befehlsfolge kann auch in eine Batch- oder Bash-Datei (.bat unter Windows]) oder ein Shell-Script (.sh unter Linux/macOS - alternative documentation]) geschrieben werden. Nach dem Schreiben und Speichern einer Batch- oder Bash-Datei doppelklicken Sie auf die Datei, um die Python-basierte GUI zu starten.
Mehr Widgets
Es gibt viel mehr Widgets als Labels und Buttons und die folgende Abbildung zeigt einige von ihnen, darunter:
A definition of the GUI window name with
master.title("Window name")A definition of the GUI window icon (ICO) with
master.iconbitmap("directory/icon-file.ico")
tk.Menumit Dropdown-Kaskadetk.Label(siehe oben)tk.Button(siehe oben)tk.Entrythat is a blank field where users can enter values or wordsttk.Comboboxthat is a drop-down menu in the master frame (tk-themedttkwidget)tk.Listboxmittk.Scrollbar, wobei die Scrollleiste erforderlich ist, um zu Listenbox-Einträgen zu navigieren, die sich nicht im sichtbaren Bereich der Listenbox-Größe befindentk.Checkbuttonthat can be checked (ticked) to set atk.BooleanVar()object toTrue(default: not checked ->False)
Alternatively, have a look attk.Radiobuttonto enable selections from a multiple-choice frame (rather than theFalse-True-only frame of a checkbutton)tk.PhotoImageto display a sub-sampled image in the GUI
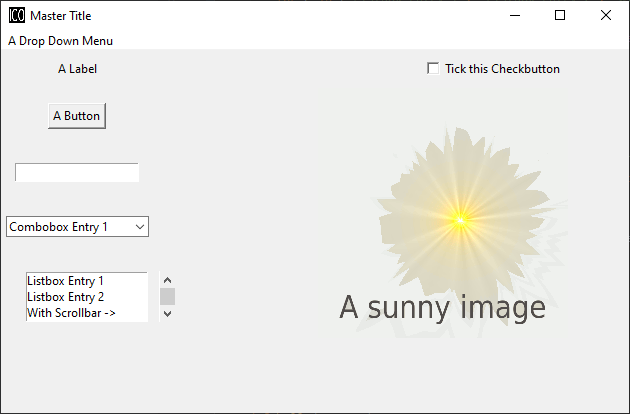
Figure 5:GUI mit mehreren Widgets wie Menü, Label, Button, Entry, Combobox, Listbox, Checkbutton und PhotoImage.
Der nächste Block enthält den Code, der die tkinter-Widgets in der Abbildung erstellt (die script, image und icon sind im Kurs-Repository verfügbar]):
import tkinter as tk
from tkinter.messagebox import showinfo
from tkinter import ttk


class MyApp(tk.Frame):
    def __init__(self, master=None):
        tk.Frame.__init__(self, master)

        self.master.title("Master Title")
        self.master.iconbitmap("gui/sample-icon.ico")

        # Set geometry: upper-left corner of the window
        ww = 628  # width
        wh = 382  # height
        wx = (self.master.winfo_screenwidth() - ww) / 2
        wy = (self.master.winfo_screenheight() - wh) / 2
        # assign geometry
        self.master.geometry("%dx%d+%d+%d" % (ww, wh, wx, wy))
        # assign space holders around widgets
        self.dx = 5
        self.dy = 5

        # Menu Bar
        self.mbar = tk.Menu(self)  # create standard menu bar
        self.master.config(menu=self.mbar)  # make self.mbar standard menu bar
        # add menu entry
        self.ddmenu = tk.Menu(self, tearoff=0)
        self.mbar.add_cascade(label="A Drop Down Menu", menu=self.ddmenu)  # attach entry it to standard menu bar
        self.ddmenu.add_command(label="Drop Down Entry 1", command=lambda: self.hello("Drop Down Menu!"))

        # Label
        self.a_label = tk.Label(master, text="A Label")
        self.a_label.grid(column=0, row=0, padx=self.dx, pady=self.dy)

        # Button
        self.a_button = tk.Button(master, text="A Button", command=lambda: self.hello("The Button!"))
        self.a_button.grid(column=0, row=1, padx=self.dx, pady=self.dy)

        # Entry
        self.an_entry = tk.Entry(master, width=20)
        self.an_entry.grid(column=0, row=2, padx=self.dx, pady=self.dy)

        # Combobox
        self.cbox = ttk.Combobox(master, width=20)
        self.cbox.grid(column=0, row=3, padx=self.dx, pady=self.dy)
        self.cbox['state'] = 'readonly'
        self.cbox['values'] = ["Combobox Entry 1", "Combobox Entry 2", "Combobox Entry ..."]
        self.cbox.set("Combobox Entry 1")
        self.cbox_selection = self.cbox.get()

        # Listbox with Scrollbar
        self.scrlbar = tk.Scrollbar(master, orient=tk.VERTICAL)
        self.scrlbar.grid(sticky=tk.W, column=1, row=4, padx=self.dx, pady=self.dy)
        self.lbox = tk.Listbox(master, height=3, width=20, yscrollcommand=self.scrlbar.set)
        for e in ["Listbox Entry 1", "Listbox Entry 2", "With Scrollbar ->", "lb entry n"]:
            self.lbox.insert(tk.END, e)
        self.lbox.grid(sticky=tk.E, column=0, row=4, padx=self.dx, pady=self.dy)
        self.scrlbar.config(command=self.lbox.yview)
        self.lbox_selection = self.lbox.get(0)

        # Checkbutton
        self.check_variable = tk.BooleanVar()
        self.cbutton = tk.Checkbutton(master, text="Tick this Checkbutton", variable=self.check_variable)
        self.cbutton.grid(sticky=tk.E, column=2, row=0, padx=self.dx, pady=self.dy)

        # Image
        logo = tk.PhotoImage(file="gui/sunny-image.gif")
        logo = logo.subsample(2, 2)  # controls size
        self.l_img = tk.Label(master, image=logo)
        self.l_img.image = logo
        self.l_img.grid(row=1, column=2, rowspan=4)
        # create a placeholder to relax layout
        tk.Label(text="                                                    ").grid(row=0, column=1)

    @staticmethod
    def hello(message):
        showinfo("Got Message from ...", message)


if __name__ == '__main__':
    MyApp().mainloop()
Es gibt viele weitere Optionen (Widgets) und TkDocs bietet einen detaillierten, modernen Überblick über verfügbare tkinter Objekte.]
tkintervariablen
In the above example, the checkbox receives a tk.BooleanVar(), which takes a True value when a user checks the checkbox. There are more variables that can be associated with tkinter widgets (e.g., tk.Entry, tk.Listbox, or ttk.Combobox). tkinter variables correspond basically to Python data types with special methods that are required to set or retrieve (get) user-defined values of these data types. Here is an overview of tkinter variables:
tk.BooleanVar()ist ein boolean, derTrueoderFalsesein kann.tk.DoubleVar()ist eine numerische Gleitkommavariable (float)tk.IntVar()is a numeric integer variabletk.StringVar()is a string (i.e., typically some text)
How does Python know when to retrieve a user-defined value? Typically, we want to evaluate user-defined values when we call a function that receives user-defined values as input arguments. Default, predefined default values in a script can be set with VARIABLE.set() and the user settings can be retrieved with VARIABLE.get(). The following script and the icon are available at the course repository.
from tkinter.messagebox import showinfo
import random

class MyApp(tk.Frame):
    def __init__(self, master=None):
        tk.Frame.__init__(self, master)

        self.master.title("GUI with variables")
        self.master.iconbitmap("gui/sample-icon.ico")

        # Set geometry: upper-left corner of the window
        ww = 628  # width
        wh = 100  # height
        wx = (self.master.winfo_screenwidth() - ww) / 2
        wy = (self.master.winfo_screenheight() - wh) / 2
        # assign geometry
        self.master.geometry("%dx%d+%d+%d" % (ww, wh, wx, wy))

        self.a_label = tk.Label(master, text="Enter a value to call:")
        self.a_label.grid(column=0, row=0, padx=5, pady=5)

        # define tk.StringVar() and assign it to an entry
        self.user_entry = tk.StringVar()
        self.an_entry = tk.Entry(master, width=20, textvariable=self.user_entry)
        self.an_entry.grid(column=1, row=0, padx=5, pady=5)

        # define Button to trigger call back
        self.a_button = tk.Button(master, text="Call Message!", command=lambda: self.message_distributor())
        self.a_button.grid(column=2, row=0, padx=5, pady=5)

        # define a Checkbutton to use either user input or a random message
        self.check_variable = tk.BooleanVar()
        self.cbutton = tk.Checkbutton(master, text="Check this box to use a random message instead of the entry", variable=self.check_variable)
        self.cbutton.grid(sticky=tk.E, column=0, columnspan=3, row=1, padx=5, pady=5)
        self.check_variable.set(False)


    def message_distributor(self):
        if not self.check_variable.get():
            showinfo("User message", self.user_entry.get())
        else:
            showinfo("Random message", self.random_message())

    def random_message(self):
        random_words = ["summer", "winter", "is", "cold", "hot", "will be"]
        return " ".join(random.sample(random_words, 3))


if __name__ == '__main__':
    MyApp().mainloop()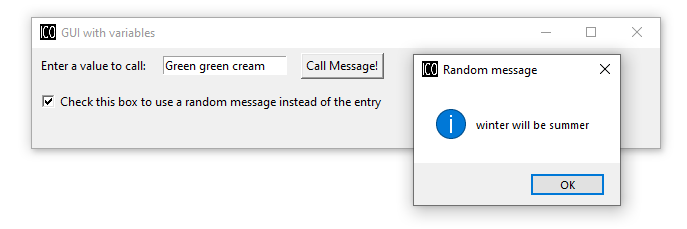
Figure 6:Die an Tk-Variablen gebundene GUI.
Design, Platz und ändern Widgets
The above code examples use both the OBJECT.grid() and the OBJECT.pack() methods (geometry managers) to place widgets in the GUI. There is an additional geometry manager in the form of the place method. The choice of a convenient geometry manager depends on your preferences and there are pros and cons for the three geometry managers:
packPlatziert automatisch Widgets in einer Box
funktioniert am besten für einfache GUIs, bei denen sich alle Widgets in einer Spalte oder Zeile befinden
Komplexe Layouts können nur mit komplizierten Workarounds gehandhabt werden (Tipp: nicht versuchen)
placePlatziert Widgets an absoluten oder relativen * x * - * y * Positionen
funktioniert gut für grafische Anordnungen von Widgets
gridordnet Widgets in Spalten und Zeilen eines Rasters
funktioniert gut mit tischähnlichen Apps und strukturierten Layouts
To enable more graphical flexibility, widgets accept many optional keywords to change their foreground (fg) or background (bg) color. In addition, widgets can be modified with the tk.OBJECT.config(PARAMETER_TO_CONFIGURE=NEW_CONFIG) method.
The following sections provide more details on the place and grid geometry managers (the relevant functions of pack are already above shown: pack() - that is all) and illustrate keyword arguments along with widget methods to modify widgets.
Platz mit place und Objektfarben
The simplest geometry manager is the pack method, which works even without any keyword provided (see the very first examples in this section). With the pack method, widgets can be placed relatively in the window (relx and rely, where both must be < 1) or with absolute positions (x and y, where both should fit into the window dimensions defined through self.config(width=INT, height=INT)). The axis origin (zero positions of x and y) is determined with the anchor keyword.
class PlacedApp(tk.Frame):
    def __init__(self, master=None, **options):
        tk.Frame.__init__(self, master, **options)
        self.pack(expand=True, fill=tk.BOTH)
        self.config(width=628, height=100)
        self.master.title("A placed GUI")
        tk.Label(self, text="Vanilla", bg="goldenrod", fg="dark slate gray").place(anchor=tk.NW, relx=0.2, y=10)
        tk.Label(self, text="Green green tree", bg="OliveDrab1").place(anchor=tk.E, relx=0.8, rely=0.5)
        tk.Label(self, text="Blue sky", bg="DeepSkyBlue4", fg="floral white").place(anchor=tk.CENTER, x=300, rely=0.8)


if __name__ == '__main__':
    PlacedApp().mainloop()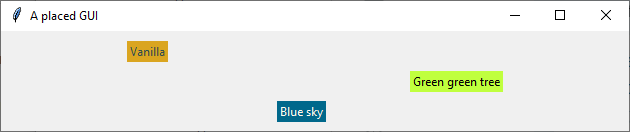
Figure 7:Die GUI organisiert mit platzierten Widgets.
Objekte mit grid platzieren
In grid-ed GUIs, the widget alignment can be controlled with the sticky argument that uses cardinal directions (e.g., sticky=tk.W aligns or “sticks” a widget at the west, meaning, left side, of a GUI). The padx and pady keywords arguments enable the implementation of pixel space around widgets.
from tkinter.messagebox import showinfo

class GriddedApp(tk.Frame):
    def __init__(self, master=None, **options):
        tk.Frame.__init__(self, master, **options)
        self.pack(expand=True, fill=tk.BOTH)
        self.config(width=628, height=100)
        self.master.title("A grid GUI")
        tk.Label(self, text="Enter name: ", bg="bisque2", fg="gray21").grid(sticky=tk.W, row=0, column=0, padx=10)
        tk.Entry(self, bg="gray76", width=20).grid(sticky=tk.EW, row=0, column=1, padx=5)
        tk.Button(self, text="Show message", bg="pale turquoise", fg="red4", command=lambda: showinfo("Info", "Random message")).grid(row=0, column=2, padx=5)
        tk.Checkbutton(self, text="A Checkbutton over multiple columns").grid(sticky=tk.E, row=1, column=0, columnspan=3, pady=15)


if __name__ == '__main__':
    GriddedApp().mainloop()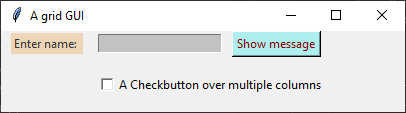
Figure 8:Die GUI organisiert auf einem Raster.
Widgets konfigurieren
Upon user action (an event), we may want to modify previously defined widgets. For instance, we may want to change the text of a label or the layout of a button to indicate successful or failed operations. For this purpose, tkinter objects can be modified with tk.OBJECT.config(PARAMETER_TO_CONFIGURE=NEW_CONFIG). Moreover, objects can be deleted (destroyed) with tk.OBJECT.destroy(), even though this is not an elegant method for any other widgets than pop-up windows (child frames of the master frame).
from tkinter.messagebox import showinfo, showerror

class ReConfigApp(tk.Frame):
    def __init__(self, master=None, **options):
        tk.Frame.__init__(self, master, **options)
        self.config(width=628, height=100)
        self.pack()

        self.user_depth = tk.DoubleVar()
        self.kst = 40.0
        self.w = 5.0
        self.slope = 0.002

        self.master.title("A GUI that reconfigures its widgets")
        tk.Label(self, text="Enter water depth (numeric, in meters): ", bg="powder blue", fg="medium blue").grid(sticky=tk.W, row=0, column=0, padx=10)
        tk.Entry(self, bg="alice blue", width=20, textvariable=self.user_depth).grid(sticky=tk.EW, row=0, column=1, padx=5)
        self.eval_button = tk.Button(self, text="Estimate flow velocity", bg="snow2", fg="dark violet", command=lambda: self.call_estimator())
        self.eval_button.grid(row=0, column=2, padx=5)

    def call_estimator(self):
        try:
            flow_depth = float(self.user_depth.get())
        except tk.TclError:
            return showerror("ERROR", "Non-numeric value entered.")
        self.eval_button.config(fg="green4", bg="DarkSeaGreen1")
        showinfo("Result", "The estimated flow velocity is: " + str(self.estimate_u(flow_depth)))

    def estimate_u(self, h):
        try:
            return self.kst * h**(2/3) * self.slope**0.5
        except ValueError:
            showerror("ERROR: Bad values defined.")
            return None
        except TypeError:
            showerror("ERROR: Bad data types defined.")
            return None


if __name__ == '__main__':
    ReConfigApp().mainloop()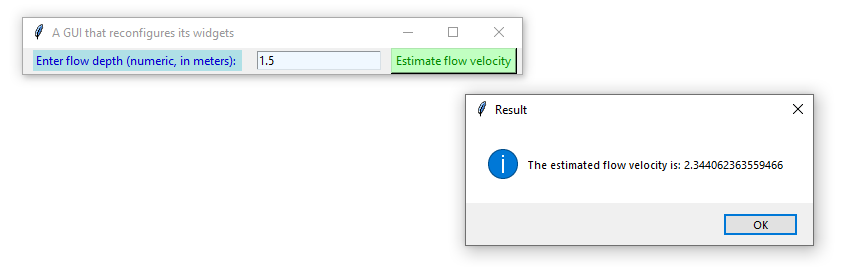
Figure 9:Die neu konfigurierte GUI.
Pop-up Windows
Standard-Nachrichten von tkinter.messagebox
Die tkinter.messagebox-Bibliothek bietet Standard-Popup-Fenster wie:
showinfo(title=STR, message=STR)that prints an information message (see above examples).showwarning(title=STR, message=STR)that prints a warning message.showerror(title=STR, message=STR)that prints an error message (see above example).askyesno(title=STR, message=STR)that returnsFalseorTruedepending on a user’s answers to a Yes-or-No question.askretrycancel(title=STR, message=STR), dasFalseoderTruezurückgibt oder erneut versucht, ein Ereignis (eine Funktion) auszuführen, abhängig von den Antworten eines Benutzers auf eine * Ja-oder-Nein-oder-Abbrechen * Frage.askokcancel(title=STR, message=STR)that returnsFalseorTruedepending on a user’s answers to an OK question.
Lesen Sie mehr über Standard-Popup-Fenster im Python docs].
Pop-ups auf höchstem Niveau
The default windows may not meet the needs for every application, for instance, to invite users to enter a custom value. In this case, a tk.Toplevel object aids in producing a customized pop-up window, and the below example shows how a customized top-level pop-up window can be called within a method. With the tk.Toplevel widget and the tk.Frame (master) widgets, the code block produces two frames, in which buttons, labels, or any other tkinter object can be placed. The very first argument of any tkinter widget-object created determines whether the object is placed in the master or the top-level frame. For example, tk.Entry(self).pack() creates an entry in the master tk.Frame, and tk.Entry(pop_up).pack() creates an entry in the child tk.Toplevel.
from tkinter.messagebox import showwarning

class PopApp(tk.Frame):
    def __init__(self, master=None, **options):
        tk.Frame.__init__(self, master, **options)
        self.config(width=628, height=50)
        self.pack()

        self.master.title("Custom pop-up GUI")
        self.pop_button = tk.Button(self, text="Open pop-up window", bg="cadet blue", fg="white smoke", command=lambda: self.new_window())
        self.pop_button.pack()

    def destroy_buttons(self):
        self.pop_button.destroy()
        self.p_button1.destroy()
        self.p_button2.destroy()
        showwarning("Congratulations", "This app is useless now. Don't press red-ish buttons ...")

    def new_window(self):
        pop_up = tk.Toplevel(master=self)
        # add two buttons to the new pop_up Toplevel object (window)
        self.p_button1 = tk.Button(pop_up, text="Destroy buttons (do not click here)", fg="DarkOrchid4",
                                   bg="HotPink1", command=lambda: self.destroy_buttons())
        self.p_button2 = tk.Button(pop_up, text="Close window", command=lambda: pop_up.quit())
        self.p_button1.pack()
        self.p_button2.pack()


if __name__ == '__main__':
    PopApp().mainloop()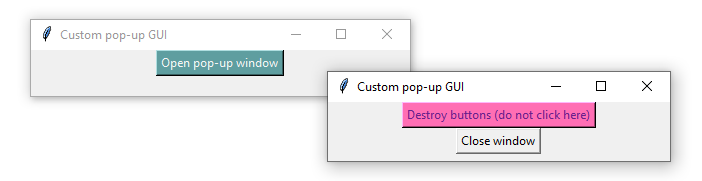
Figure 11:Die GUI mit angepasstem Popup-Fenster.
Dateidialog (öffnen ...)
When a custom function’s argument is a file or file name, we most likely want the user to be able to select the file type needed. The tkinter.filedialog library provides methods to let users choose general or specific file types. Specific file types can be defined with the filetypes=("Name", "*.ending") (or filetypes=("Name", "*.ending1;*.ending2;...") for multiple file types) keyword argument. The following example illustrates the usage of tkinter.filedialog’s askopenfilename.
from tkinter.filedialog import askopenfilename
from tkinter.messagebox import showinfo

class OpenFileApp(tk.Frame):
    def __init__(self, master=None, **options):
        tk.Frame.__init__(self, master, **options)
        self.config(width=628, height=50)
        self.pack()

        self.master.title("GUI to open a file")

        self.pop_button = tk.Button(self, text="Open a text file", bg="light steel blue", fg="dark slate gray", command=lambda: self.open_file())
        self.pop_button.pack()

    def open_file(self):
        file_types = (("Text", "*.txt;*.csv;*.asc"),)  # equivalent to [("Text", "*.txt;*.csv;*.asc")]
        file_name = askopenfilename(initialdir=".", title="Select a text file", filetypes=file_types, parent=self)
        showinfo("File info", "You selected " + str(file_name))


if __name__ == '__main__':
    OpenFileApp().mainloop()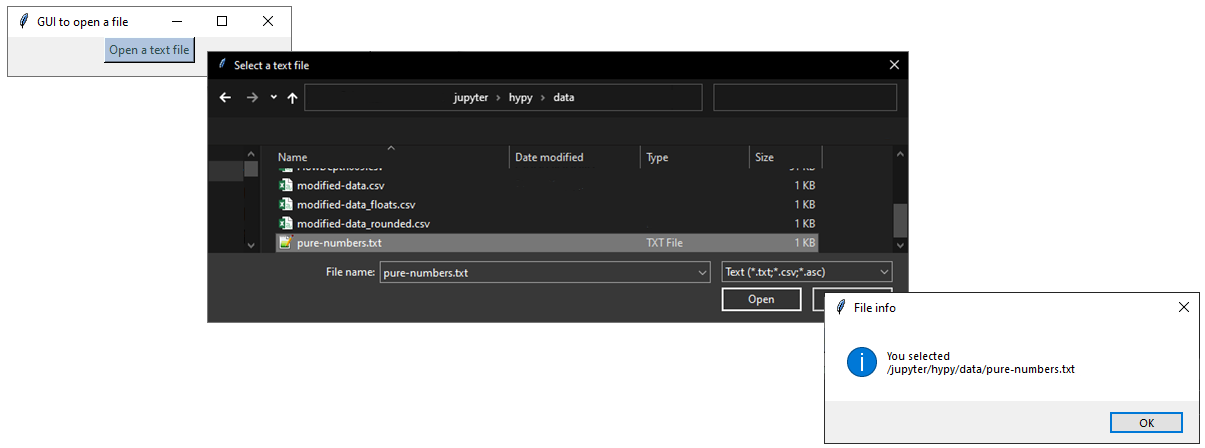
Figure 12:Die GUI mit fileialog, um eine Datei auszuwählen.
Quittung
To cleanly quit a GUI, use tk.Frame.quit() (i.e., in a custom class, write self.quit() or master.quit()). The above example of the PopApp class also features the destroy() method, which helps to remove particular widgets.
tkinter bietet viele weitere Optionen wie die Implementierung von Tabs mit ttk.Notebook() (erfordert binding von Tab-Objekten]), Tabellen (from tkintertable import TableCanvas, TableModel) oder interaktive Grafikobjekte mit matplotib.
import matplotlib
matplotlib.use('TkAgg')
import numpy as np
from matplotlib.backends.backend_tkagg import FigureCanvasTkAgg
from matplotlib.figure import Figure
Genießen Sie die Erstellung Ihrer benutzerdefinierten Apps!