Your computer is one of your most important educational companions. So you want to protect the health of your computer and avoid problems caused by redundant or even malicious software. For this reason, it is recommended to install all software used on this website on a so-called Virtual Machine (VM). This page explains what VMs are, what advantages they have exactly, and how you can install Debian Linux, one of the most stable and secure operating systems. It does not matter if you use Apple’s mac OS or Microsoft’s Windows, or if you already use Linux: The VM will look the same at the end.
About
What is a Virtual Machine (VM)?
A Virtual Machine (VM) represents a virtual operating system (OS) running on a host system that directly runs on a physical computer. The physical computer (hardware) resources of the host system are allocated via so-called hypervisors. For this reason, the virtual machine is referred to as a guest machine and the hypervisor as a host machine. Thus, a guest machine is an isolated, virtualized environment that runs independently on the host operating system.
Why use a VM?
Free resources on a computer represent, from an economic point of view, dead storage space that causes costs without generating income. This is why system administrators often create multiple virtual servers to better allocate physical resources and save energy. A VM is also useful for smart end-users such as researchers and engineers. Here are some advantages of a VM:
Applications and services of multiple VMs do not interfere with each other.
Independence of the guest system from the operating system of the host system and the physical hardware.
VMs can be moved or cloned by simply copying them to other systems.
Hardware resources can be dynamically allocated via the host hypervisor.
Better and more efficient use of existing hardware resources.
Short deployment times for systems and applications running on a VM.
VMs provide high availability and flexibility because of their independence of physical resources.
In the context of hydro-informatics for water resources management, a VM can serve to execute various Python scripts with different dependencies or, most importantly, to set up a clean and efficient environment for the execution of numerical models such as open TELEMAC-MASCARET.
This tutorial provides guidance on creating a new VM, re-using an existing VM, and working with Debian Linux on a VM.
Contents and Debian Linux
This page guides through the installation of a Debian Linux virtual machine. The host hypervisor is assumed to be Oracle’s VirtualBox on Windows. If you are not using Windows, just download the VirtualBox installer that suits your system. While VirtualBox works x-platform, there are other, more powerful platform specific utilities for creating VMs:
sudo apt install gnome-boxes
sudo apt install virt-manager qemu-kvm libvirt-daemon-system
UTM is a free, open-source VM application for macOS (and iOS) that lets you run Windows, Linux, and other operating systems on a Mac. It uses Apple’s Hypervisor framework to run ARM64 systems on Apple Silicon at near-native speeds, while also supporting emulation for x86/x64 and over 30 other processor architectures via its QEMU backend. UTM is completely free with no feature restrictions, making it an accessible choice for anyone who needs to test software across different platforms.
The guest machine will run Debian Linux, which is one of the most stable Linux distributions, and it is freely available. Because of its stability, Debian is an ideal baseline for running numerical simulations that may last for days or even weeks. Of course, there are other options, and Debian is rather one of the best options than the best option.
There are a couple of Debian Linux spin-offs, such as Ubuntu with some other derivatives that are more lightweight (and faster). New Linux users will have an easy start with the Ubuntu variants Linux Mint (Xfce) or Lubuntu. Most versions Ubuntu can be used instead of the Debian Linux presented here to complete the tutorials on this website.
Get prerequisites (required software)
Estimated duration: 5-30 minutes (depends on connection speed).
Download and install the latest version of VirtualBox (version 7.2 or newer as of 2026).
Oracle’s VirtualBox is a free and open-source hosted hypervisor software.
The installation of VirtualBox requires administrator rights on the host machine. So if you are working in a professional environment, talk to your IT administrator.
VirtualBox installers are available for Windows, mac OS (including Apple Silicon via the dedicated ARM build), and Linux hosts.
Download the latest Debian Linux (or one of its spin-offs - see next bullet point) net installer (this is the recommended solution for working with TELEMAC):
The current stable release is Debian 13 (codename trixie).
Find the CD-section and click on the amd64 version
Scroll to the bottom of the page and download the latest net installer (e.g., debian-13.x.x-amd64-netinst.iso)
If the above link is not working, visit debian.org, find the Getting Debian section (do not click on the one in the top menu), click on CD/USB ISO images and click on Download CD/DVD images using HTTP.
ISO images for Debian spin-offs can also be used to complete the tutorials on this website (all-round systems):
Lubuntu is a fast and light-weight derivative of Ubuntu (the current LTS is Ubuntu 26.04).
Linux Mint is another efficient Ubuntu-based distribution that tracks the most recent Ubuntu LTS release (e.g., Linux Mint 22.x “Wilma”/“Xia”/“Zara”/“Zena” is built on Ubuntu 24.04 LTS).
Remember where the downloaded Linux .ISO file is stored.
Create a VM with VirtualBox
Estimated duration: 5-8 minutes.
In your host system (e.g., Windows 11), click on Start, type Oracle VM VirtualBox, and hit enter. In the opened VirtualBox manager window:
Click on the blue New button to open the VM creation wizard and enter:
Name: Debian Linux
Note: The wizard should automatically recognize the Type andVersion fields.Machine Folder:
C:\Users\USERNAME\VirtualBox VMsType: Linux
Version: Debian (64-bit)
> Click on the Next buttonAllocate memory size: the more memory is allocated to the VM, the faster will be the VM (and for example TELEMAC-MASCARET), but the slower will be the host system (Windows 11). Rule of thumb: stay in the green range of the bar (e.g., allocate 8192 MB or more)
> Click on the Next buttonSelect Create a virtual hard disk now and click on the Create button.
Select VDI (native to VirtualBox) and click on Next.
Preferably choose Dynamically allocated to start with a small virtual disk size, which can take a maximum size to be defined in the next step. Click on the Next button.
Leave the default disk name as is and allocate a maximum size for the virtual disk (recommended: min. 32 GB). Click on the Create button.
Great - the basics are all set now and we are back in the VirtualBox main window, where a Debian Linux VM should be visible now on the left side of the window.
With the Debian Linux VM highlighted (i.e., just click on it), click on the yellow Settings wheel button, which opens the Settings window:
In the System/Motherboard tab, verify the memory allocation and check the Enable EFI (special OSes only) box (enable).
In the System/Processor tab, select the number of processors that the VM uses. To avoid slowing down the host system (Windows 11), stay in the green range of the CPU bar. For parallel processing with TELEMAC-MASCARET, allocate at least 4 CPUs.
In the Display tab, check the Enable 3D Acceleration box.
In the Storage tab, find the Controller: IDE, where an Empty disk symbol should be located below.
Click on the Empty disk symbol and find the Attributes frame on the right side of the window, where a small blue disk symbol should be visible.
Click on the small blue disk symbol to Choose a disk file ... > select the Debian Linux net installer (e.g., debian-13.x.x-amd64-netinst.iso) that you downloaded before.
Click OK.
Install Debian Linux
Estimated duration: 30 minutes.
To install Debian Linux to the VM, start the before-created Debian Linux VM in the VirtualBox manager window (click on the Debian Linux VM and then on the green Start arrow). The VirtualBox VM window will ask for the .iso file to use (confirm the selected one), and start navigating through the installation:
Inside the VirtualBox VM window, select the Graphical install option.
Navigate through the language options (recommended: English - English (United States)).
Optionally define a hostname (e.g., debian-vm) and a domain name (e.g., debian-net).
Create a root user name and password (write down the credentials somewhere) as well as a user name (no root rights) and password.
Set up the clock.
Disk partitioning: Choose the Guided - use entire disk option. Click Continue (2 times).
Select the All files in one partition (recommended for new users) option. Click Continue.
Make sure that Finish partitioning and write changes to disk is selected and click Continue.
Select Yes in the next step (Write the changes to disks?).
... grab your favorite beverage and wait while the installation progresses ...Select No to answer the question Scan another CD or DVD? and click Continue.
Select the geographically closest mirror to access Debian archives (software repositories and updates) and click Continue (2 times).
Skip the proxy information question (just click Continue).
Optionally, select No to answer the question Participate in the package usage survey? and click Continue.
Software to install: Select GNOME (the default Debian desktop) and keep the other defaults (Debian desktop, print server, and standard system utilities). Since Debian 12, the installer also enables the non-free-firmware component by default, which Debian 13 (trixie) treats as a first-class repository component for hardware drivers.
... continue enjoying your favorite beverage and wait while the installation progresses ...Click Continue to finalize the installation and reboot (or shutdown) the VM.
Once the VM is shut down, re-open the VM Settings (from VirtualBox Manager window) and go to the Storage tab. Verify that there is again an Empty disk symbol in the Controller: IDE field.
Re-use (Export/Transfer or Copy) a VM on another Host
Once you have created a VM on a virtual hard disk (the *.vdi file), you can always transfer it to another host system with its ecosystem. To copy (or transport) the VM:
On the original host:
Shut down the VM you want to reuse.
In VirtualBox go to File > Export Appliance....
Follow the instructions to export the VM to a
*.ovafile (the export process may take 10-15 minutes).
On the new host:
Make sure that VirtualBox is installed.
Copy the exported
*.ovafile to the new host system.Open VirtualBox and go to File > Import Appliance...
Navigate to the directory where you copied the
*.ovafile.Click Next.
Check the Appliance settings and click Import.
Now, the virtual machine should be visible in the list of virtual machines in VirtualBox.
Import an Existing VM in Oracle VM VirtualBox
Instead of creating a new VM from scratch, you can import an existing VM into Oracle VM VirtualBox. This is useful when a VM has already been configured with the required OS, software, settings, and user environment.
Existing VMs are commonly provided in one of the following formats:
an appliance file, typically
.ovaor.ovfa virtual disk image, such as
.vdi,.vmdk, or.vhd
The import procedure depends on the file type.
Import a VM Appliance
Make sure that Oracle VM VirtualBox is installed, as described in the VM requirements. Then open VirtualBox and:
Go to File > Import Appliance...
Select the
.ovaor.ovffile.Click Next.
Review the appliance settings, including:
VM name
base folder
CPU allocation
RAM allocation
network adapter settings
virtual disk location
Adjust the settings if necessary.
Click Finish or Import.
After the import, the VM should appear in the list of available VMs in VirtualBox.
Register an Existing Virtual Disk
If the VM is provided as a virtual disk image rather than an appliance, create a new VM and attach the existing disk:
Click New in VirtualBox.
Enter a VM name.
Select the appropriate OS type and version.
Assign RAM and CPU resources.
When prompted for a hard disk, select Use an Existing Virtual Hard Disk File.
Select the
.vdi,.vmdk, or.vhdfile.Finish the VM setup.
Before starting the VM, check the VM settings and adjust them if needed.
Start and Configure the Imported VM
After importing or registering the VM, start it from the VirtualBox main window. On the first start, check the following items:
Keyboard layout: Make sure the guest OS uses the expected keyboard layout.
User credentials: Use the credentials provided with the VM documentation.
Network access: Check whether the VM uses NAT, bridged networking, or another network mode.
Display settings: Adjust screen resolution and scaling if required.
Guest Additions: Install or update VirtualBox Guest Additions if shared clipboard, dynamic resizing, or folder sharing do not work.
System updates: If the guest OS supports package updates, update it before installing additional software.
Shared folders: To exchange files between the host and guest systems, configure shared folders as described in folder sharing.
For Linux guests, system updates can usually be started from the graphical update manager or from the terminal. For Debian- or Ubuntu-based systems, use:
sudo apt update
sudo apt full-upgrade
sudo apt autoremove
Recommended VM Settings
Before using the VM for larger computations or software installations, review the following settings:
RAM: Allocate enough memory for the guest OS and applications, but leave sufficient RAM for the host system.
CPU: Assign multiple CPU cores only if the host system has enough resources.
Storage: Make sure the virtual disk has enough free space.
Network: Use NAT for simple internet access, or bridged networking if the VM must be visible on the local network.
Snapshots: Create a snapshot before major updates or configuration changes.
A snapshot allows you to return to a previous VM state if an update, installation, or configuration step fails.
Debian Linux
Setup Linux
Estimated duration: 15 minutes.
Start the Debian Linux VM from the VirtualBox manager window. Once Debian Linux has started, log on with your user credentials.
To enable the full functionality of the system, open the Linux Terminal (CTRL + Alt + T or go to Activities > Files (filing cabinet symbol), right-click in any folder and select Open in Terminal). In Terminal type:
suEnter the above-created password for the root user name (see installation section).
Install all packages required for building kernel modules:
apt update
apt install build-essential dkms linux-headers-$(uname -r)
Find the Devices drop-down menu of the VirtualBox VM window (not in Debian Linux itself) and select Insert Guest Additions CD image... (depending on the version of VirtualBox, this menu can be on the top or the bottom of the window).
Back in the Debian Linux Terminal, mount the Guest Additions iso file by typing in Terminal:
sudo mkdir -p /mnt/cdrom
sudo mount /dev/cdrom /mnt/cdrom
Navigate to the mounted directory and execute the VBoxLinuxAdditions
cd /mnt/cdrom
sudo sh ./VBoxLinuxAdditions.run --nox11
The kernel modules will be installed now and Terminal should prompt a message that invites you to reboot the system. Do so by typing:
shutdown -r nowAfter rebooting, make sure that the installation was successful. In Terminal type:
lsmod | grep vboxguestThe installation was successful if the Terminal’s answer is something like vboxguest 358395 2 vboxsf. Read more about Guest Additions on the VirtualBox developer’s website.
To improve the visual experience do the following:
In the top-left corner of the Debian Linux Desktop, click on Activities and type displays in the search box.
Open the Displays settings to select a convenient display resolution.
If you choose a too high resolution, the VirtualBox VM window will turn black and jump back to the original resolution after 15-30 seconds.
Consider also turning on Night Light to preserve your eye vision.
Apply the changes and close the Displays settings.
Linux Terminal
Estimated duration: 60 minutes.
To get familiar with Debian Linux, go to the Activities menu and find the applications LibreOffice-Writer, Firefox, the Software application (shopping bag symbol), and the File manager (filing container symbol). Find more applications by clicking on the four dots on the left of the menu bar - can you find the Text Editor? To shutdown Debian Linux (i.e., the VM), click on the top-right corner arrow and press the Power symbol.
The GNOME Terminal is one of the most important features, even though it optically shows only an empty window with a blinking cursor at the beginning. There are many ways to open Terminal and here are two options:
Go to Applications and type Terminal in the search box, or
Open the File browser (Applications > Files - the filing container symbol), navigate to the folder where you want to run Terminal, right-click in the free space, and left-click on Open in Terminal.
Terminal runs many powerful native Linux (UNIX) commands, which is the most robust way to install and execute features. There are a couple of tutorials for learning to use Terminal and one of the most comprehensive is provided on the Linux Ubuntu website (Ubuntu is based on Debian Linux). It is highly recommended to go through the tutorial provided by the Ubuntu community (estimated duration: 51 minutes), for better understanding some contents of this eBook. In particular, memorize the commands cd (change directory), su/sudo (superuser), ls (listen) and mkdir (make directory).
User Rights
When installing software later, it is good practice to install it for your user account and not for root. Such system-relevant actions require superuser (su) rights. However, your default user name is not on the so-called sudoers list, which is essentially a file where all user accounts are listed that are authorized to use sudo in front of any command. So add your user account to the su-doers list by opening Terminal and typing:
su
    password: ...
sudo usermod -aG sudo YOUR-USER-NAME
Open a new Terminal tab (Shift + CTRL + T), which should open up in your default user space with default user rights. Check if your account is on the sudoers list by typing:
sudo -vIf visually nothing happens, you are good to go. Otherwise, if you get a message like Sorry, user [username] may not run sudo on [hostname]., verify that you correctly typed the above command and YOUR-USER-NAME (with correct cases).
VM Settings
Enable Folder Sharing between Host and Guest
Estimated duration: 5-10 minutes.
Sharing data between the host system (e.g., Windows 11) and the guest system (Debian Linux VM) enables the transfer of files to and from the VM to the host system.
At a place of your convenience, create a new folder on the host system (e.g., Windows 11) and call it shared (e.g.,
C:\Users\USER\documents\shared\).Start VirtualBox and the Debian Linux VM.
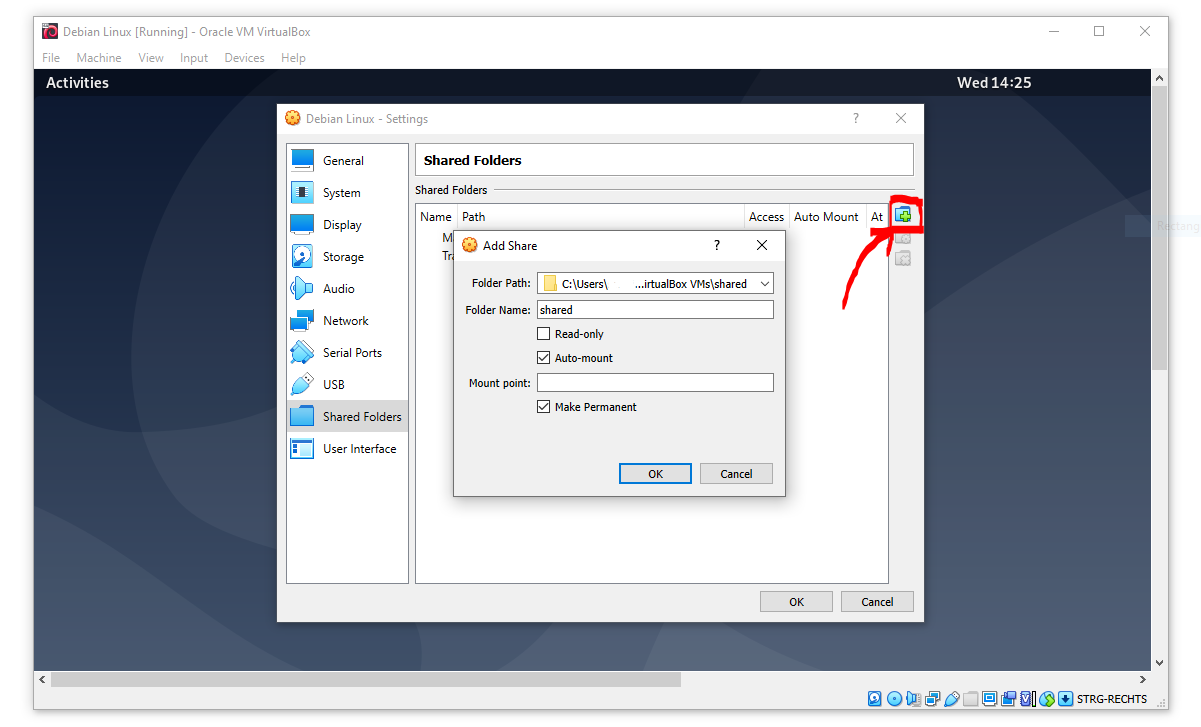
Make sure that the scaled view mode is off (toggle view modes with RIGHTCTRL(Host) andCon the keyboard).Go to the VM VirtualBox window’s Devices menu, click on Shared Folders > Shared Folders Settings... and click on the little blue Add new shared folder symbol on the right side of the window (see figure below). Make the following settings in the pop-up window:
Folder Path: Select the just created
...\sharedfolderCheck the Enable Auto-mount box
Check the Make Permanent box
Click OK on both pop-up windows.
The shared folder will then be visible in the Files (Activities > Filing cabinet symbol) on the left (e.g., as sf_shared).
A Permission denied message is likely to appear when you click on sf_shared. The message may appear because your user name is not assigned to the vboxsf group. The vboxsf is the one, which is automatically assigned for accessing the shared folder. To verify the group name, go to the shared folder, right-click in the free space, and select Permissions. A window with group names that have access to the shared folder opens. To add your username type (in Terminal):
sudo usermod -aG vboxsf YOUR-USER-NAMEAfterward, reboot the Debian Linux VM and test if you can access the folder, and create and modify files. More information on Permission denied errors is provided in the troubleshooting section on Permission Denied Messages in Linux.
Enable OpenGL
VirtualBox experimentally enables OpenGL, which is used by many graphical user interfaces. To make OpenGL work on a virtual machine, the install X.Org X Window System (xserver):
sudo apt install xorgRun Xorg as a normal user with:
startxOr run Xorg as root (superuser) with:
sudo service gdm startTo edit the configuration of Xorg run:
sudo editor /etc/X11/xorg.confAdd Nvidia repositories and drivers (often not necessary on Debian 12+ because the installer enables non-free-firmware by default):
sudo apt install software-properties-common
sudo add-apt-repository contrib
sudo add-apt-repository non-free
sudo add-apt-repository non-free-firmware
sudo apt update
Then install OpenGL libraries. On a non-Nvidia or generic setup, the GLVND-based packages are:
sudo apt install libopengl0 libglx0 libglvnd0 libgl1-mesa-driOn a system with the Nvidia proprietary driver installed (replace xxx with the driver series shown by nvidia-detect or Driver Manager, e.g. 550 or 570):
sudo apt install libnvidia-gl-xxxSoftware Management
Estimated duration: Variable.
Install Software
To install other software, preferably use the built-in software manager (Activities > Shopping bag symbol). The Software manager uses official releases in the stable Debian repository (read more about lists of sources).
The last command removes files that are not needed anymore and reduces system garbage.
Instructions for installing particular and Debian-compatible software (e.g., QGIS) can be found directly on the website of software developers. For example, to install Anaconda Python visit docs.anaconda.com and follow the installation instructions for Debian Linux.
The most popular software manager of Debian-based Linux distributions is called aptitude, which is the thing that you invoke when typing [sudo] apt [something]. There are more standard package managers, such as dpkg or synaptic (see the full list in the Debian package management faqs). To install a wide range of proprietary software (e.g., video conferencing tools), package management tools like snapd or flatpak can be useful. However, such third-party package managers are debated, and a more robust approach is to use apt whenever possible, or, if the software is not available through apt, look for AppImages.
Useful Software
System Monitoring
There are multiple options to monitor system resource of a Debian distro, and this section presents two of them, namely, htop and stacer. htop is a minimalistic tool that runs in Terminal. stacer is a graphical user interface providing more options, including optimization of battery life or system performance.
To install htop for visualizing CPU usage, type:
sudo apt update
sudo apt install htop
Start htop’s CPU monitor with:
htopTo install the more general stacer tool, type:
sudo apt update
sudo apt install stacer
After the installation, stacer can be opened from the system menu (search for stacer).
Add Package Repositories
For adding (trusted) software (package) repositories use software-properties-common, which provides the add-apt-repository command:
sudo apt install software-properties-common
sudo add-apt-repository contrib
sudo add-apt-repository non-free
sudo add-apt-repository non-free-firmware
sudo apt updateFind Packages
Some software will run into errors because of missing library files (e.g., libGLX.so.0: No such file or directory). To find out what package needs to be installed for getting the missing library file, install apt-file
sudo apt install apt-file
sudo apt-file update
To find out the package name of a missing library file (e.g., libGLX.so.0), tap:
apt-file find libGLX.so.0After a couple of seconds of searching, apt-file will prompt something like:
libglx0-glvnd-nvidia: /usr/lib/x86_64-linux-gnu/libGLX.so.0That means, to get the library file libGLX.so.0, the package libglx0-glvnd-nvidia must be installed; for instance:
sudo apt install libglx0-glvnd-nvidiaUpdate Software
To update repositories and upgrade installed packages through apt, that is the standard Debian package manager aptitude, open Terminal and type:
sudo apt update
sudo apt full-upgrade
sudo apt autoremove
sudo apt autoclean
This will not update manually installed software, and packages installed through snapd and flatpak.
Windows Apps on Linux
Estimated duration: 10-15 minutes.
The Wine application provides a Windows-like environment on Linux systems, which enables installing and running Windows applications. Wine can be either used through the convenient sandboxes like Bottles or directly installed on your Linux system.
Bottles is a powerful tool that provides isolated sandboxes for running Windows software, even if your system’s wine installation is buggy. To install Bottles (via Flatpak - recommended) including relevant Vulkan libraries, fire up Terminal and tap:
flatpak install flathub com.usebottles.bottles
flatpak install flathub com.obsproject.Studio.Plugin.OBSVkCapture
flatpak install flathub org.freedesktop.Platform.VulkanLayer.MangoHud
flatpak install flathub org.freedesktop.Platform.VulkanLayer.vkBasalt
flatpak install flathub org.freedesktop.Platform.VulkanLayer.gamescope
Then run bottles:
flatpak run com.usebottles.bottlesTest with relevant software for numerical simulation (e.g., BlueKenue and HEC-RAS):
Create a folder for Windows installers, like
~/installers/WindowsSoftware/Create a new Bottle: Open Bottles > Click + New Bottle > Choose:
Environment: Application
Name:
HydroSoftwareKeep it 64-bit
Install core dependencies before you do anything else:
Core fonts:
allfonts.NET framework:
dotnet472(for HEC-RAS - installation may take a while)Visual C++ 2013 and 2015-2022 Redistributables (x64):
vcredist2022andvcredist2012
Go back to the bottle and open the Settings of the bottle:
In the Components section, make sure the Runner (
soda), DXVK, VKD3D, and DXVK NVAPI are enabled; LatencyFleX can be enabled, but no need for it; if things are buggy later, try switching off DXVK (and therefore VKD3D, too)In the Display section, enable Discrete Graphics
In the Display section > Advanced Settings, disable Virtual Desktop (for stability); only enable Fullscreen Mouse Capture, Mouse Warp, and Window Manager Decorations; you may want to switch the Renderer -- this setting had no influence in our testing but GDI is said to perform best and stablest
In the Performance section, disable everything
In the Compatibility section, make sure Windows 10 in set (11 was still buggy during testing) and everything else is disabled
In the Snapshots section, disable everything
Download relevant installers:
For BlueKenue, get the latest installer as described in the Telemac Forum and save it in
~/installers/WindowsSoftware/For HEC-RAS, go to the HEC-RAS download page and download and installer into
~/installers/WindowsSoftware/; note: in our testing, we only succeeded with running HEC-RAS 5.0.7 (or earlier) -- newer versions sooner or later caused errors
Install software inside the bottle
Open the bottle > Run Executable
Select the downloaded BlueKenue or HEC-RAS installer from
~installers/WindowsSoftware/Install path: default is OK (e.g.,
C:\Program Files\HEC\...)Finish installers
Launch software:
After successful installation, new software should occur in the Bottle’s Programs section
If not, scroll down to the Tools section, expand Legacy Wine Tools, and click on Explorer to navigate through the sandbox system
Lutris is a game/application launcher for Linux that manages wine installations and configurations of your system. It provides pre-configured install scripts and handles different wine versions to run Windows software on Linux. It not only handles games but also external installers, which makes it a useful tool for installing Windows-based modeling software on Linux. However, in contrast to Bottles, it is tied to your system’s wine installation. Here are three options to install Lutris:
Option 1: Use Debian repositories (most stable version)
sudo apt update
sudo apt install lutris
Option 2: Flatpak (latest version)
flatpak install flathub net.lutris.Lutris
# run it
flatpak run net.lutris.Lutris
Option 3: From Lutris repository (newest features)
# add Lutris repository
echo "deb [signed-by=/usr/share/keyrings/lutris.gpg] https://download.opensuse.org/repositories/home:/strycore/Debian_12/ ./" | sudo tee /etc/apt/sources.list.d/lutris.list
# add GPG key
wget -qO- https://download.opensuse.org/repositories/home:/strycore/Debian_12/Release.key | gpg --dearmor | sudo tee /usr/share/keyrings/lutris.gpg > /dev/null
# install it
sudo apt update
sudo apt install lutris
Afterward, installing software through Lutris is straightforward: find the + sign to Install a Windows game from media and follow the workflow.
Proton is Valve’s Steam-focused compatibility layer that builds on Wine plus tools like DXVK and VKD3D-Proton to translate Windows game APIs to Linux, enabling most Windows games to run without modification.
The short way (detailed steps below):
Install prerequisites (AMD/Intel):
sudo dpkg --add-architecture i386
sudo apt update
sudo apt install steam-installer vulkan-tools \
  mesa-vulkan-drivers mesa-vulkan-drivers:i386 \
  libgl1-mesa-dri libgl1-mesa-dri:i386 gamemode mangohud
Install prerequisites (NVIDIA, replace 5xx listed in Driver Manager):
sudo dpkg --add-architecture i386
sudo apt update
sudo apt install steam-installer vulkan-tools libvulkan1 libvulkan1:i386 \
  libnvidia-gl-5xx libnvidia-gl-5xx:i386 gamemode mangohud
Flatpak Steam and ProtonUp-Qt:
flatpak install flathub com.valvesoftware.Steam
flatpak install flathub net.davidotek.pupgui2
flatpak run net.davidotek.pupgui2
Useful Steam Launch Options:
mangohud gamemoderun %command%
PROTON_LOG=1 %command%
PROTON_NO_ESYNC=1 PROTON_NO_FSYNC=1 %command%
PROTON_USE_WINED3D=1 %command%
DETAILED PROCEDURE -- Start with preparing the graphics stack and 32-bit support:
Enable 32-bit packages and update.
sudo dpkg --add-architecture i386
sudo apt update
Install Vulkan tools and required 32-bit OpenGL/Vulkan userspace.
AMD or Intel iGPU (Mesa):
sudo apt install vulkan-tools mesa-vulkan-drivers mesa-vulkan-drivers:i386 \
    libgl1-mesa-dri libgl1-mesa-dri:i386
NVIDIA:
In Linux Ubuntu/Mint, open Driver Manager and install the recommended proprietary NVIDIA driver, then reboot.
Add matching 32-bit userspace (replace 5xx with your actual driver series shown in Driver Manager; this ensures Proton’s 32-bit games can load NVIDIA’s libs):
sudo apt install libnvidia-gl-5xx libnvidia-gl-5xx:i386
sudo apt install vulkan-tools libvulkan1 libvulkan1:i386
If your Ubuntu/Mint release uses a different package naming, install the shown
libnvidia-gland its\:i386twin for your version.
Verify Vulkan is actually working.
vulkaninfo | lessYou should see a list of your GPU and Vulkan extensions. If this fails, fix drivers before proceeding.
Next, continue with installing Steam:
Option -- APT (recommended for the fewest sandbox quirks):
sudo apt install steam-installerLaunch Steam once so it finishes self-updating.
Option -- Flatpak (works fine; just know the paths differ):
flatpak install flathub com.valvesoftware.Steam
flatpak run com.valvesoftware.Steam
Now, turn on Proton:
Open Steam. Go to Settings > Compatibility
Check Enable Steam Play for supported titles
Also check Enable Steam Play for all other titles
Set the default compatibility tool to Proton Experimental for the newest fixes (can be overridden per-game later)
Steam will auto-download the chosen Proton build the first time you launch a Windows game.
Optional but recommended: Proton-GE (community build):
Proton-GE (GloriousEggroll) often fixes issues before Valve ships them.
Install ProtonUp-Qt (easiest manager).
APT install of Steam
ProtonUp-Qt AppImage: download and run it, or install via Flatpak:
flatpak install flathub net.davidotek.pupgui2
flatpak run net.davidotek.pupgui2
Flatpak Steam users should also install ProtonUp-Qt via Flatpak as shown above.
In ProtonUp-Qt, choose the Steam install you use, then install the latest Proton-GE release. It will land in the right directory automatically.
In Steam, set a game’s Properties > Compatibility > Force the use of a specific Steam Play compatibility tool and pick the Proton-GE version you just installed.
Launch a Windows game with Proton:
Install the game like normal from your Library.
First run may show Installing Microsoft VC++/DirectX inside Proton. Let it finish.
If you see issues (crashes, black screen), try:
Switching Proton version: Properties > Compatibility > pick another Proton (Experimental, a stable major, or Proton-GE).
Verifying files: Properties > Installed Files > Verify integrity.
Deleting the game’s Proton prefix (see Manage prefixes below) and relaunching.
Using Proton with non-Steam Windows games:
Steam > Add a Game > Add a Non-Steam Game > browse to the game’s .exe.
After adding, right-click the new entry > Properties > Compatibility > Force the use of a specific Steam Play compatibility tool > choose Proton Experimental or Proton-GE.
If the game needs to run from its own folder, set Shortcut to the .exe and Start in to the game directory.
Launch it from Steam like any other title.
Game overlays, performance tools, and launch options:
GameMode (lets the kernel and CPU governor favor a certain game):
sudo apt install gamemodeAdd this to a game’s Launch Options in Steam:
gamemoderun %command%MangoHud (lightweight FPS and frame-time overlay):
sudo apt install mangohudLaunch Options:
mangohud %command%Combine with GameMode:
mangohud gamemoderun %command%Proton logging (captures a debug log in the game folder or home directory):
PROTON_LOG=1 %command%The log filename is usually steam-.log.
Common Proton environment toggles (use only when needed):
Force DirectX 11 via DXVK instead of DirectX 12:
DXVK_ENABLE_NVAPI=0 %command%Force WineD3D (OpenGL) instead of DXVK/VKD3D if Vulkan is broken:
PROTON_USE_WINED3D=1 %command%Disable Esync/Fsync if you see weird hangs:
PROTON_NO_ESYNC=1 PROTON_NO_FSYNC=1 %command%
Where are the Proton files and saves?
Proton creates a Windows-like prefix per game.
APT Steam paths:
Proton prefixes:
~/.steam/steam/steamapps/compatdata/<APPID>/pfx/Windows C: drive inside prefix:.../pfx/drive_c/Custom Proton installs (Proton-GE):
~/.steam/steam/compatibilitytools.d/
Flatpak Steam paths:
Base Steam dir:
~/.var/app/com.valvesoftware.Steam/.local/share/Steam/Prefixes:
.../steamapps/compatdata/<APPID>/pfx/Custom Proton installs:
.../compatibilitytools.d/
Managing prefixes:
To factory reset a game’s Proton environment, close Steam, then delete its folder at
compatdata/<APPID>/. You will lose per-game Windows registry and wineprefix data (treat it like a fresh Windows install for that title).To browse the prefix quickly: right-click the game > Properties > Installed Files > Browse and navigate upward into
compatdata.
Quick troubleshoot playbook:
Game fails to launch after an update:
Switch Proton version.
Verify game files.
Delete the
compatdata/<APPID>prefix and relaunch.
Black screen with audio:
Alt+Enter to toggle fullscreen.
Add
PROTON_LOG=1and inspect the log for missing 32-bit GL/Vulkan libs.Try a different Proton (or Proton-GE).
Controller weirdness:
Steam Settings > Controller > enable Steam Input for your device.
Per-game > Controller > pick a community layout or Gamepad with Mouse Trackpad for KB/M-only titles.
On top of wine, the currently maybe best available frameworks is PlayOnLinux, which can be installed as follows:
sudo apt install winbind playonlinux winetricks -y Note that winbind is required to correctly pass on Windows login information for licensed software such as MS Office.
After the installation, go to the system Menu > Applications > search for PlayOnLinux. Before continuing, setup a wine version to use by clicking on Tools > Manage Wine Versions. Most applications now run on 64 bit architectures, so adding the newest amd64 Wine version might be a good choice. After installing a wine version, click on the Configure button in the main window to select a wine configuration to use and click on New to setup an environment (e.g., HYINFO-ENVIRONMENT. Follow the installation instructions.
The +Install button opens a pop-up window with a search box to look for Windows applications that can be directly installed. Additionally, on the bottom of the pop-up window, the Install a non-listed program option enables to install other Windows installers, which are not listed. During the first installation of a Windows application, PlayOnLinux shows a couple of messages with very important information - take the time to read them.
To install a particular .exe or .msi that you downloaded, such as BlueKenue, click on the Configure button in the main window and highlight your above-created environment. Go to the Miscellaneous tab and click on Run a .exe file in this virtual drive. Follow the installation process. To run such manually installed software, click again on Configure > Miscellaneous > Run a .exe file in this virtual drive and navigate to where the program was just installed. If no direct shortcut is available, finding the software can be a bit confusing, but, worry not, here is how you find it:
In the pop-up window (after Run a .exe file ...), go to your Linux user home folder (e.g., /home/hydro-informatics/), then enable viewing of hidden files (press CTRL + H on your keyboard), which will make the hidden folder /home/hydro-informatics/.PlayOnLinux/ visible. Double-click on this hidden folder, then on wineprefix > YOUR-ENVIRONMENT-NAME (e.g., HYINFO-ENVIRONMENT) > drive_c and find the installed program either in the Program Files or Program Files (x86) directory.
For instance, to open a 64-bit installation of BlueKenue, navigate to /home/hydro-informatics/.PlayOnLinux/wineprefix/HYINFO-ENVIRONMENT/drive_c/Program Files/CHC/BlueKenue64 and double-click on BlueKenue64.exe (replace hydro-informatics and HYINFO-ENVIRONMENT with your local directory names). The program should now open.
The above-described installation of Debian Linux creates a 64-bit VM and to enable program compatibility with 32-bit architectures, add 32-bit architectures through Terminal:
sudo dpkg --add-architecture i386 && sudo apt updateThen, install Wine with:
sudo apt install wine wine32 wine64 libwine libwine:i386 fonts-wineAfter installing Wine, verify or configure folder links and compatibility environments by typing wine winecfg, which opens the Wine configuration window, where:
Folder links are defined in the Desktop Integration tab.
The Applications tab enables to define the Windows compatibility layer to use (e.g., Windows 10) and set applications.
To install a Windows application:
Download the installer (e.g., an exe or msi file).
Open Terminal and type
wine control> A Windows-like window opens (read more).In that window, click on the Add/Remove... button, which opens up another window (Add/Remove Programs).
Click on the Install... button and select the downloaded exe or msi installer.
Follow the installation instructions (standard Windows procedure).
Consider to add a Desktop Icon, or note the installation directory (e.g.,
"C:\\Program Files (x86)\\CHC\\BlueKenue\\").In the background. Terminal might prompt the message
err:mscoree:LoadLibraryShim error reading registry key for installroot- you may ignore such messages (read more).
Never run wine as root (sudo).
Why? It is just not safe. So if you did run wine as root anyway, roll back with cd $HOME and tap sudo chown -R $USER:$USER .wine
More information is available in the wine docs.
Launch a Windows application by typing wine explorer in Terminal. Wine’s Windows file system will be displayed in a Windows-like window. To start and application:
If a Desktop Icon was created during the installation, go to Desktop and double-click on the application (e.g., BlueKenue)
Otherwise, identify the installation path and the executable that launches the application.
32-bit programs are typically installed in
"C:\\Program Files (x86)\\(e.g.,"C:\\Program Files (x86)\\CHC\\BlueKenue\\BlueKenue.exe").64-bit programs are typically installed in
"C:\\Program Files\\.
With the installation path, any Windows application can be launched through Terminal with:
wine "C:\\path\\to\\the.exe"(use\\to separate sub-directories).For example,
wine "C:\\Program Files (x86)\\CHC\\BlueKenue\\BlueKenue.exe"typically starts Blue KenueTM.